shade guide

A shade guide is a tool containing standardized color samples, used to ensure consistency and precision in color matching across various industries. It helps professionals achieve accurate results efficiently, enhancing decision-making and outcomes in fields like dentistry, cosmetics, and design. By organizing colors systematically, shade guides bridge the gap between visual perception and practical application, making them indispensable for professionals seeking precise color matching solutions.

What is a Shade Guide?

A shade guide is a standardized tool containing a series of organized color samples, designed to facilitate accurate color matching across various industries. It is commonly used in dentistry for tooth color matching, cosmetics for foundation shades, and other fields requiring precise color alignment. The guide typically presents colors in a structured format, such as gradients or grouped hues, enabling professionals to quickly identify and select the appropriate shade. By providing a consistent reference, shade guides enhance decision-making and efficiency, ensuring reliable outcomes in color-critical applications.

Importance of Shade Guides in Various Industries

Shade guides play a crucial role in ensuring color consistency and accuracy across industries. In dentistry, they are essential for matching tooth colors, enabling natural-looking restorations. Similarly, in cosmetics, they help individuals find foundation shades that perfectly complement their skin tone and undertones. These tools enhance professional outcomes, streamline decision-making, and reduce errors. By providing standardized references, shade guides foster precision and reliability, making them indispensable in both aesthetic and functional applications. Their systematic approach to color matching ensures that professionals can achieve consistent results, meeting client expectations and maintaining high standards of quality.

Components of a Shade Guide

A shade guide typically includes a series of standardized color samples, organized by value (lightness), hue (color), and chroma (saturation). These components ensure precise color matching, with examples like the Vita Classic Shade Guide illustrating this structured approach to color organization and selection.

Understanding Value, Hue, and Chroma

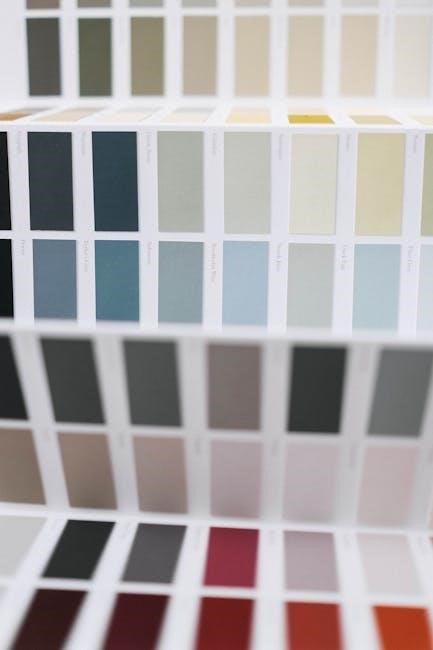
In color theory, value, hue, and chroma are the foundational elements used in shade guides. Value refers to the lightness or darkness of a color, ranging from black to white. Hue is the actual color itself, such as red, blue, or yellow. Chroma measures the intensity or saturation of the hue, determining how vibrant or muted it appears. Together, these components allow for precise color matching, enabling professionals to select shades accurately. Shade guides organize colors based on these principles, ensuring consistency and ease of use across applications like dentistry and cosmetics.

Structure and Organization of Shade Guides

Shade guides are systematically organized to facilitate easy color identification and matching. They are typically structured based on three key color variables: value (lightness or darkness), hue (actual color), and chroma (intensity or saturation). This arrangement allows users to methodically narrow down shades, starting with value, then chroma, and finally hue. Many guides, such as the Vita Classic, group shades into families or rows for simplicity. Some systems also include numerical or alphabetical codes to enhance precision. This logical structure ensures consistency and efficiency in color matching, making shade guides invaluable tools for professionals in dentistry, cosmetics, and design.

Applications of Shade Guides

Shade guides are essential in dentistry for tooth color matching and in cosmetics for foundation shade selection. They also aid in design and manufacturing for precise color replication, ensuring consistency and accuracy across various industries.

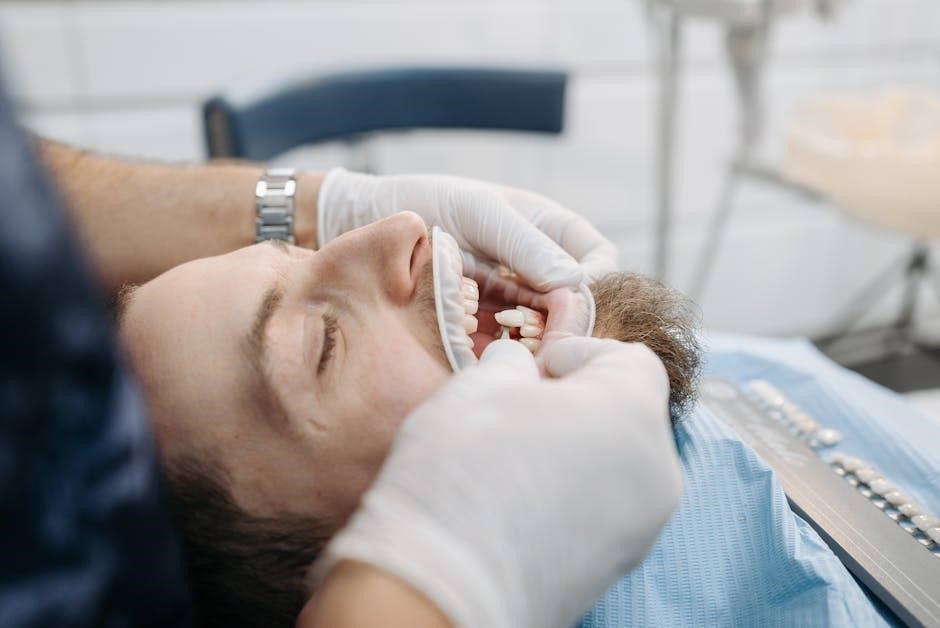
Dental Applications: Tooth Color Matching

In dentistry, shade guides are essential for achieving accurate tooth color matching, ensuring natural-looking restorations. Tools like the VITA Classic and VITA 3D shade guides are widely used, organizing shades by value, hue, and chroma. Dentists select the closest match to a patient’s teeth, aiding in crown, veneer, and implant placements. Proper shade selection enhances aesthetics and patient satisfaction, making it a critical step in restorative procedures. Despite challenges like lighting conditions and human perception, advanced shade guides and digital tools improve precision, ensuring seamless integration of dental work with natural tooth color for optimal results. This process is vital for both functional and cosmetic success.

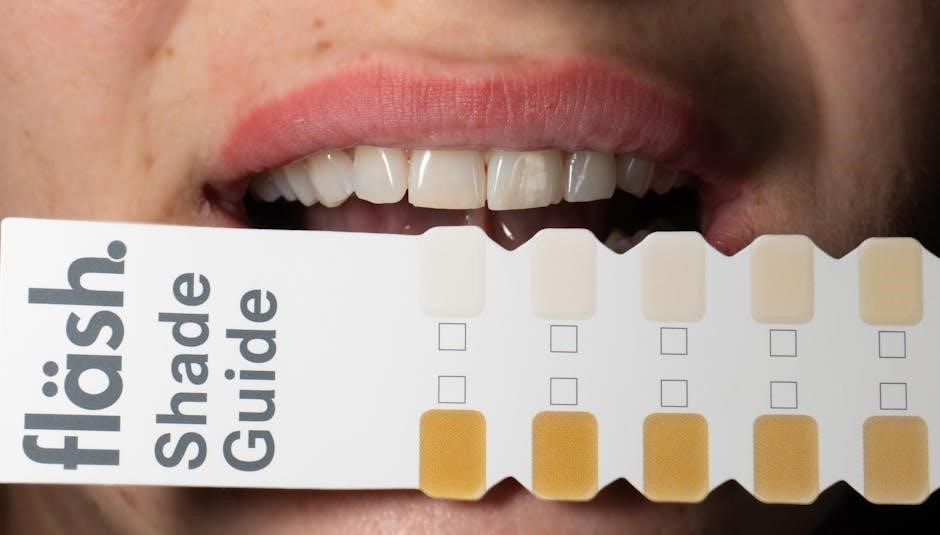
Makeup and Cosmetics: Foundation Shade Matching

In cosmetics, shade guides are crucial for determining the perfect foundation match, ensuring seamless skin tone blending. They help identify undertones, whether warm, cool, or neutral, and guide color selection. Many makeup brands offer extensive shade ranges, but matching remains challenging, especially online. Tools like swatch testing and digital shade-matching apps assist in finding the right hue. Understanding one’s undertones and testing shades on the jawline are key steps. Proper foundation matching enhances natural appearance, boosting confidence. With the rise of diverse shade offerings, accurate matching has become a cornerstone of the cosmetics industry, aiding both professionals and consumers in achieving flawless results.

Tools and Technology in Shade Matching

Modern shade-matching tools combine traditional guides with digital solutions, enhancing accuracy. Devices like spectrophotometers and apps analyze colors precisely, streamlining the process across industries for optimal results.

Shade-Matching Devices and Their Evolution

Shade-matching devices have evolved significantly, transitioning from manual guides to advanced digital tools. Traditional systems, like the Vita Classic, relied on physical shade tabs, while modern devices use spectrophotometers and AI for precise color analysis. These advancements improve accuracy, reducing human error and enhancing communication between professionals and clients. Digital tools also offer real-time data, enabling faster and more reliable shade selection. The integration of technology has revolutionized industries, ensuring consistent results and streamlining workflows. This evolution underscores the importance of adapting to technological advancements in achieving optimal color matching solutions across various fields.

Challenges in Shade Selection

Accurate shade matching is often difficult due to variations in lighting, human perception, and material properties. These factors can lead to discrepancies, requiring skilled adjustment and communication to ensure satisfactory results.

Common Difficulties and Solutions

Shade selection often presents challenges, such as variability in human color perception and lighting conditions. To address these, professionals use advanced shade-matching devices that minimize subjective errors. Regular calibration of tools and training in color theory also improve accuracy. Additionally, maintaining consistent lighting environments and using standardized communication methods help ensure reliable results. These strategies collectively enhance the precision of shade matching, making it easier to overcome common difficulties and achieve desired outcomes across industries like dentistry and cosmetics. By combining technology and best practices, professionals can master shade selection effectively.

Evolution of Shade Guides

Shade guides have transitioned from traditional physical models to advanced digital tools, enhancing accuracy and accessibility. Modern technology now enables real-time color matching, improving efficiency and precision across industries.

From Traditional to Digital Shade Matching

Shade matching has evolved significantly, transitioning from traditional physical guides to advanced digital tools. Once reliant on manual comparisons using physical shade guides like the Vita Classic, professionals now leverage digital solutions. Modern technology, such as shade-matching apps and AI-driven systems, enhances accuracy and efficiency. These tools allow for real-time color analysis, reducing human error and improving consistency. Digital shade matching also enables easier communication between professionals and clients, streamlining workflows. While traditional guides remain essential, digital solutions are revolutionizing industries, offering faster and more precise outcomes; This shift underscores the growing role of technology in achieving optimal color accuracy.

How to Choose the Right Shade Guide

Selecting the right shade guide involves understanding your industry’s specific needs, ensuring color accuracy, and considering ease of use and portability for precise color matching.

Factors to Consider for Different Industries

When selecting a shade guide, industries must consider specific factors. For dentistry, accuracy in tooth color matching is crucial, while cosmetics focus on skin tone and undertones. Manufacturers prioritize material compatibility and durability. Each field requires guides tailored to its unique demands, ensuring precise and reliable results.

Additionally, ease of use, portability, and adaptability to lighting conditions are key. Digital integration and custom options further enhance utility. Understanding these factors ensures the right tool is chosen for optimal outcomes across diverse applications.

Case Studies and Real-World Examples

Real-world examples highlight the effectiveness of shade guides in dental and cosmetic applications, showcasing successful outcomes in tooth matching and foundation shade selection for diverse clients.

Success Stories in Dental and Cosmetic Applications

In dentistry, shade guides like the VITA Classical have revolutionized tooth color matching, enabling precise smile makeovers. They ensure natural-looking restorations, boosting patient satisfaction. Similarly, in cosmetics, foundation shade guides have transformed how makeup artists and consumers find perfect matches, enhancing personalization. These tools have set new standards, making color accuracy accessible and reliable across industries, with proven success in real-world applications.

Shade guides are essential tools, evolving from traditional to digital, enhancing color accuracy in dentistry, cosmetics, and beyond. Their future promises advanced precision, shaping industry standards globally, ensuring optimal outcomes and efficiency in color matching.

The Future of Shade Guides and Their Impact

The future of shade guides promises exciting advancements, particularly in digital and AI-driven technologies. These innovations will enhance precision, personalization, and accessibility in color matching. Digital shade guides, integrated with machine learning, will enable real-time adjustments and predictions, reducing human error. Additionally, 3D printing and virtual reality tools will revolutionize how shades are selected and applied, offering bespoke solutions. These developments will not only streamline workflows but also elevate client satisfaction across industries like dentistry and cosmetics. As technology evolves, shade guides will become more intuitive, ensuring consistent and reliable results, thereby shaping a more efficient and personalized future for professionals and clients alike.

kirkland chicken wings cooking instructions

Kirkland chicken wings are a popular choice for delicious, convenient meals. Known for their tender texture and flavorful options, they offer versatility in cooking methods and seasonings, making them a favorite for various dishes and gatherings.

1.1 Overview of Kirkland Chicken Wings

Kirkland chicken wings are a popular choice for convenient and flavorful meals. These wings are typically pre-seasoned and frozen, offering a versatile base for various cooking methods. Whether baked, grilled, or air-fried, they deliver a crispy exterior and tender interior. Their pre-seasoned flavor profiles, such as buffalo or BBQ, make them a crowd-pleaser. Perfect for snacks, appetizers, or main dishes, Kirkland wings are a go-to option for home cooks and party hosts due to their ease of preparation and delicious results. They are widely available in stores and online, making them a staple for many kitchens.

1.2 Importance of Proper Cooking Instructions

Following proper cooking instructions is crucial for achieving the best taste and texture with Kirkland chicken wings. Incorrect methods can lead to undercooked or overcooked wings, affecting both safety and flavor. Adhering to recommended cooking times and temperatures ensures even cooking and food safety. Proper techniques also enhance crispiness and prevent sogginess, making the wings more enjoyable. By sticking to guidelines, home cooks can consistently deliver delicious results, whether baking, grilling, or frying. This attention to detail elevates the overall dining experience, ensuring Kirkland wings meet their full culinary potential every time.

Cooking Methods for Kirkland Chicken Wings

Kirkland chicken wings can be baked, air-fried, deep-fried, or grilled. Each method offers a unique texture and flavor, from crispy to smoky, ensuring versatility for any preference.

2.1 Baked Chicken Wings in the Oven

Baking Kirkland chicken wings in the oven is a simple and healthier alternative to frying. Preheat the oven to 400°F (200°C). Place the wings on a baking sheet lined with parchment paper. Drizzle with olive oil and season with your favorite spices. Bake for 30-35 minutes, flipping halfway through, until crispy and cooked through. For extra crispiness, increase the temperature to broil for the last 5 minutes. Ensure the internal temperature reaches 165°F (75°C) for safety. This method yields tender, flavorful wings with minimal effort and cleanup.

2.2 Air Fryer Cooking Instructions

Cooking Kirkland chicken wings in an air fryer is a healthier and crispy alternative. Preheat the air fryer to 400°F (200°C). Pat the wings dry with paper towels to enhance crispiness. Season with garlic powder, paprika, salt, and pepper; add cayenne for spice. Cook in a single layer, in batches if necessary, for 25 minutes, shaking halfway. For extra crispiness, increase heat to 420°F (220°C) for the last 5 minutes. Ensure internal temperature reaches 165°F (74°C). Toss in buffalo or BBQ sauce and serve with celery and blue cheese for a complete snack.

2.3 Deep-Frying for Crispy Wings

Deep-frying Kirkland chicken wings yields crispy, golden results. Heat 2-3 inches of oil (vegetable or peanut) in a deep pot to 350°F (175°C). Pat wings dry with paper towels to remove excess moisture. Carefully add wings in batches to avoid overcrowding. Fry for 8-10 minutes or until golden brown, adjusting heat to maintain temperature. Use a thermometer for accuracy. Drain on paper towels to remove excess oil. Season immediately with salt, pepper, and spices. For extra flavor, toss in buffalo or BBQ sauce. Ensure internal temperature reaches 165°F (74°C) for food safety. Serve hot for maximum crispiness and enjoy the satisfying crunch.

2.4 Grilling for Smoky Flavor

Grilling Kirkland chicken wings adds a smoky, char-grilled flavor. Preheat the grill to medium-high heat (375°F or 190°C). Thaw wings completely and pat dry with paper towels. Season with salt, pepper, garlic powder, and your favorite spices. Lightly oil the grates to prevent sticking. Place wings on the grill, leaving space for even cooking. Close the lid and cook for 20-25 minutes, flipping halfway. For extra crispiness, finish over high heat. Ensure internal temperature reaches 165°F (74°C). For smoky depth, add wood chips like apple or hickory. Serve hot with your favorite dipping sauce for a flavorful treat.

Thawing and Preparation

Thaw Kirkland chicken wings safely in the fridge or cold water. Pat dry with paper towels before seasoning or marinating to ensure even cooking and crispy texture.

3.1 Safe Thawing Methods

Thawing Kirkland chicken wings requires careful attention to food safety. The preferred method is thawing in the refrigerator, which ensures even thawing and prevents bacterial growth. Place the wings on a leak-proof tray or bag to avoid cross-contamination. For quicker thawing, submerge the sealed package in cold water, changing the water every 30 minutes. Never thaw at room temperature, as this can lead to unsafe conditions. Pat dry thoroughly before cooking to achieve the best texture and flavor.

3.2 Preparing Wings for Cooking

After thawing, preparing Kirkland chicken wings involves a few simple steps to ensure optimal flavor and texture. Pat the wings dry with paper towels to remove excess moisture, which helps seasonings adhere and promotes crispiness when cooking. Trim any excess fat or cartilage if needed. For enhanced flavor, season generously with your preferred spices or marinate for at least 30 minutes to several hours. Optional: mix with a little baking powder for extra crispiness. Always ensure hands and utensils are clean during preparation to maintain food safety standards.

Seasoning and Marinades

Kirkland chicken wings can be seasoned with classic blends like garlic, paprika, and herbs or marinated in soy sauce and spices for enhanced flavor and texture.

4.1 Classic Seasoning Blends

Classic seasoning blends are a staple for Kirkland chicken wings, offering a flavorful and aromatic experience. Common ingredients include garlic powder, onion powder, salt, pepper, paprika, and cayenne. These blends can be combined with herbs like thyme or rosemary for a savory twist. For a spicy kick, chili powder or smoked paprika adds depth. A simple dry rub or light oil-based marinade ensures even distribution. These blends enhance the natural taste of the wings without overpowering them, making them a versatile choice for both casual meals and special occasions. Proper seasoning balance ensures crispy, juicy, and delicious results every time.

4.2 Marinade Recipes for Enhanced Flavor

Marinades are an excellent way to infuse Kirkland chicken wings with bold, complex flavors. A basic marinade might include olive oil, garlic, herbs like thyme or rosemary, and spices such as paprika or cayenne. For a tangy twist, mix in vinegar or lemon juice. Marinating for several hours or overnight enhances the wings’ tenderness and flavor absorption. Experiment with combinations like soy sauce, honey, and ginger for a sweet-and-savory Korean-inspired glaze, or hot sauce and butter for spicy Buffalo-style wings. These marinades ensure a juicy, flavorful result, complementing any cooking method you choose.

Serving Suggestions

Kirkland chicken wings pair perfectly with a variety of sides and dips. Try serving them with ranch dressing, blue cheese sauce, or a refreshing celery stick platter.

5.1 Dipping Sauces and Condiments

Kirkland chicken wings are best enjoyed with a variety of dipping sauces and condiments. Classic options include ranch dressing, blue cheese sauce, and BBQ sauce for a tangy twist. For those who prefer a lighter option, a yogurt-based ranch dip or a fresh tzatziki sauce can complement the smoky flavors. Additionally, a side of garlic butter or a zesty lemon-herb sauce adds a rich and aromatic touch. These condiments enhance the overall flavor profile, making every bite a delightful experience.

5.2 Side Dishes to Pair with Wings

Pairing Kirkland chicken wings with the right side dishes elevates your meal to the next level. Coleslaw is a classic choice, offering a refreshing crunch that contrasts the rich flavors of the wings. French fries or onion rings add a satisfying crispiness, while celery sticks with ranch or blue cheese dressing provide a lighter, cooling option. For a hearty combination, try garlic bread or baked potatoes, which complement the savory flavors. These sides balance the meal, ensuring a well-rounded and enjoyable dining experience for any occasion.

Safety Tips and Storage

Always handle Kirkland chicken wings safely by thawing them in the refrigerator or cold water. Store cooked wings in airtight containers and consume within 3-4 days for freshness.

6.1 Handling Frozen Chicken Safely

Handling frozen Kirkland chicken wings requires careful attention to safety to prevent contamination and foodborne illness. Always store them at 0°F (-18°C) or below. Thawing should be done in the refrigerator, in cold water, or in the microwave—never at room temperature. Ensure frozen wings are sealed in airtight packaging to maintain quality and prevent freezer burn. Wash hands thoroughly before and after handling frozen chicken. Avoid cross-contamination by using separate utensils and surfaces for frozen and thawed wings. Never refreeze thawed chicken wings to maintain safety and freshness.

6.2 Storing Cooked Wings Properly

Storing cooked Kirkland chicken wings properly is essential for maintaining freshness and safety. Cool cooked wings to room temperature within two hours to prevent bacterial growth. Transfer them to an airtight container and refrigerate at 40°F (4°C) or below within two hours of cooking. For longer storage, freeze them at 0°F (-18°C) in a sealed container or freezer bag. Label and date the container for easy tracking. When reheating, ensure wings reach an internal temperature of 165°F (74°C) to guarantee food safety. Proper storage helps preserve flavor and texture for future enjoyment.

Kirkland chicken wings are a delightful and versatile option for any meal, offering convenience and great flavor. Whether baked, air-fried, deep-fried, or grilled, they cater to various preferences. This guide has covered essential cooking methods, seasoning ideas, and storage tips to ensure perfect results. By following these instructions, both beginners and experienced cooks can achieve crispy, juicy, and flavorful wings. Experiment with different recipes and enjoy the journey of creating delicious meals with Kirkland chicken wings!

el niño jesús no odia a los mariquitas gratis pdf

El Niño Jesús No Odia a los Mariquitas is a satirical coloring book by Don Julio, published by Fandogamia Editorial in 2024. It critiques homophobia through humorous illustrations, sparking controversy due to its childlike design despite adult themes. The book gained popularity with a free PDF version online, blending social critique with engaging activities.

1.1 Background and Overview

El Niño Jesús No Odia a los Mariquitas is a satirical coloring book created by Don Julio, published by Fandogamia Editorial in 2024. Blending humor with social critique, the book challenges homophobia through its unique design and activities. Despite its childlike illustrations, the content is clearly intended for adults, sparking debate due to its controversial themes. A free PDF version has been widely shared online, further amplifying its reach and impact. The book has become a focal point for discussions on satire, religion, and societal norms.

1.2 The Book’s Unique Concept

El Niño Jesús No Odia a los Mariquitas stands out for its innovative blend of satire, social critique, and interactive activities. The book uses a childlike design, complete with coloring pages, to address mature themes like homophobia and religion. This contrast between playful visuals and sharp commentary creates a provocative experience. Aimed at adults, it challenges societal norms while encouraging reflection through engaging exercises. Its free PDF version has further boosted its accessibility, making it a viral sensation and sparking debates on its controversial yet thought-provoking approach.

The Satirical and Controversial Nature of the Book

El Niño Jesús No Odia a los Mariquitas uses satire to critique homophobia and religion, sparking controversy due to its provocative blend of humor and sensitive topics, leading to public debate.

2.1 The Use of Satire to Address Social Issues

El Niño Jesús No Odia a los Mariquitas employs satire to tackle homophobia and religious hypocrisy, using humor and irony to highlight societal biases. The book’s childlike illustrations contrast sharply with its mature themes, creating a provocative yet thought-provoking narrative. By blending comedy with critique, Don Julio challenges readers to reflect on prejudice and intolerance, making it a bold example of how satire can spark meaningful conversations about sensitive topics in contemporary culture.

2.2 The Controversy Surrounding Its Release

El Niño Jesús No Odia a los Mariquitas sparked intense debate upon its release in 2024. Critics accused it of blasphemy and promoting inappropriate content for children, despite its adult target audience. Legal challenges arose, with Christian Lawyers filing a lawsuit, though it was later dismissed. The book’s satirical approach to religion and homophobia polarized public opinion, with some praising its bold critique of societal issues and others condemning its provocative style. Its free PDF version heightened its visibility, fueling both support and outrage across social media platforms.

The Author and Publisher

Don Julio, alias of Julio A. Serrano, authored the book, while Fandogamia Editorial published it, known for humorous and satirical content.

3.1 Don Julio (Julio A. Serrano) and His Previous Works

Don Julio, the alias of Julio A. Serrano, is known for blending satire with social commentary. His previous work, Ser Fascista Está Mal, achieved significant success with five editions. This book, like his others, uses humor to critique societal issues, establishing him as a provocative voice in contemporary literature. His unique style often sparks debate, reflecting his commitment to challenging norms through creative expression.

3.2 The Role of Fandogamia Editorial in Publishing the Book

Fandogamia Editorial played a pivotal role in bringing El Niño Jesús No Odia a los Mariquitas to the public. Known for publishing provocative and humorous content, the editorial supported Don Julio’s vision, ensuring the book’s satirical message reached its target audience. By backing the project, Fandogamia demonstrated its commitment to free expression and challenging societal norms, aligning with their reputation for unconventional and bold publications. Their involvement was crucial in amplifying the book’s impact and sparking necessary conversations.

The Book’s Design and Content

El Niño Jesús No Odia a los Mariquitas features childlike, colorful illustrations and satirical content aimed at critiquing homophobia. It includes activities and a free PDF version.

4.1 The Childlike Illustrations and Their Purpose

El Niño Jesús No Odia a los Mariquitas features whimsical, childlike illustrations that contrast sharply with its satirical and adult themes. These vibrant, playful visuals are designed to critique homophobia by presenting serious issues in an unexpectedly innocent format. The illustrations serve as a metaphorical tool, highlighting the absurdity of prejudice through their simplicity and charm. This artistic choice not only engages readers but also underscores the book’s message of acceptance and inclusivity. The free PDF version amplifies its reach, ensuring broader accessibility to its thought-provoking content.

4.2 The Activities and Messages Within the Book

El Niño Jesús No Odia a los Mariquitas combines coloring pages, puzzles, and humorous sketches with bold messages critiquing homophobia and religious hypocrisy. The activities, such as coloring scenes of Jesus embracing diversity, are designed to engage readers while sparking reflection on societal prejudices. The book’s playful format contrasts with its sharp satire, making complex issues more accessible. Its free PDF version ensures widespread distribution, amplifying its call for tolerance and inclusivity. This blend of humor and critique creates a powerful tool for fostering dialogue on sensitive topics.

The Legal and Social Reactions

El Niño Jesús No Odia a los Mariquitas sparked legal disputes, with a lawsuit filed against it, though it was eventually dismissed. Socially, the book caused polarized reactions, with supporters praising its critique of homophobia and critics condeming its controversial themes, particularly on social media platforms like Twitter, where debates over free speech and child protection escalated.

5.1 The Lawsuit Against the Book and Its Outcome

El Niño Jesús No Odia a los Mariquitas faced a lawsuit filed by Christian Lawyers, alleging it promoted pedophilia and was unsuitable for children. The court dismissed the case, ruling the book’s satirical nature and free speech protections outweighed the accusations. The dismissal affirmed the work’s classification as adult satire, not a children’s book, aligning with the publisher’s defense. This outcome highlighted the balance between artistic expression and societal sensitivities, sparking further debate on censorship and creative freedom.

5.2 Public Opinion and Reactions on Social Media

Public opinion on “El Niño Jesús No Odia a los Mariquitas” has been polarized, with fierce debate on social media. Supporters praise its satirical approach to critiquing homophobia, while critics accuse it of blasphemy and inappropriate content. Many users shared the free PDF, sparking viral discussions about its intent and suitability. Some defend it as a bold critique of societal hypocrisy, while others condemn its provocative imagery. The book’s childlike design has led to confusion and outrage, fueling its notoriety and online presence significantly.

The Book’s Availability and Distribution

El Niño Jesús No Odia a los Mariquitas is available in print through online retailers like Amazon and Agapea.com. A free PDF version has also been widely shared online, boosting its accessibility and sparking further debate about its content and purpose.

6.1 Where to Purchase the Book

El Niño Jesús No Odia a los Mariquitas is available for purchase through various online platforms, including Amazon and Agapea.com. It can also be found on Casa del Libro and other major bookstores. Priced at 4 euros, the book is sold in a stapled format, making it an affordable and accessible option for readers. Additionally, a free PDF version has gained significant popularity online, further increasing its reach and visibility among audiences.

6.2 The Free PDF Version and Its Popularity

A free PDF version of El Niño Jesús No Odia a los Mariquitas has been widely shared online, contributing to its viral spread. Available for download on platforms like Google Drive, it has attracted significant attention, especially among younger audiences. The free version has been praised for its accessibility, allowing readers to engage with its satirical content without purchasing a physical copy. Its popularity has further amplified the book’s controversial reputation, making it a hot topic on social media and discussion forums.

The Book’s Reception Among Different Audiences

El Niño Jesús No Odia a los Mariquitas has received mixed reactions. Adults praise its satirical critique of homophobia, while some critics argue its content is inappropriate for children, sparking debate.

7.1 Adult Readers’ Perspectives

Adult readers have found the book both thought-provoking and humorous, appreciating its satirical approach to addressing homophobia and religious satire. Many praise its ability to spark conversations about sensitive topics, while others criticize its controversial content. The free PDF version has made it accessible to a broader audience, contributing to its viral spread. Despite debates about its appropriateness, the book has been embraced by those who value its bold critique of societal norms and its unique blend of art and activism.

7.2 The Misinterpretation as a Children’s Book

The book’s childlike illustrations and activity format led many to mistakenly believe it was intended for children, despite its adult themes and satirical content. The free PDF version, widely shared online, exacerbated this confusion, as some parents unknowingly downloaded it for their kids. Critics, including religious groups, accused the book of being inappropriate for minors due to its explicit satire and adult humor. This misunderstanding sparked controversy, with legal challenges and public debates over its suitability for young audiences.

The Book’s Themes and Messages

The book tackles themes of homophobia and religion through satire, using colorful illustrations to critique societal prejudices. Its messages promote tolerance and spark reflection on sensitive issues creatively.

8.1 Homophobia and Its Critique

The book directly critiques homophobia through satirical illustrations and activities, challenging societal prejudices. By presenting these issues in a humorous yet thought-provoking way, it encourages readers to reflect on tolerance and acceptance. The coloring activities serve as a metaphor for filling in the gaps left by societal biases, promoting understanding and dialogue. This approach makes the critique of homophobia accessible and engaging, sparking conversations about inclusivity and human rights in a creative format.

8.2 Religion and Its Satirical Portrayal

The book uses religious imagery, particularly Jesus, to satirically address hypocrisy and prejudice. By depicting Jesus in a modern, relatable context, it challenges traditional religious doctrines that often perpetuate homophobia. The childlike illustrations contrast sharply with the adult themes, creating a stark satire that critiques religious intolerance. This portrayal sparks reflection on how religion is sometimes misused to justify discrimination, using humor and irony to highlight the contradictions between teachings of love and practices of exclusion.

The Impact of the Book on Society

The book challenges societal norms by satirically addressing homophobia and sparking dialogue on tolerance. Its free PDF version has amplified its reach, inspiring debates on religion, satire, and social change;

9.1 Promoting Dialogue on Sensitive Topics

El Niño Jesús No Odia a los Mariquitas has sparked significant dialogue on sensitive issues like homophobia and religion through its satirical approach. By blending humor with critique, the book encourages readers to reflect on societal norms and prejudices. Its controversial nature has led to widespread discussions, both online and offline, fostering debate about the role of satire in addressing taboo subjects. The free PDF version has further amplified its reach, making it accessible to a broader audience and promoting engagement with its provocative themes.

9.2 The Role of Satire in Modern Society

Satire serves as a powerful tool for social critique, challenging norms and provoking reflection. El Niño Jesús No Odia a los Mariquitas exemplifies this by using humor and irony to address homophobia and religious hypocrisy. Its controversial nature highlights how satire can stir debate, forcing society to confront uncomfortable truths. The book’s free PDF version has amplified its impact, showcasing how satire can reach a broad audience and inspire dialogue in the digital age. Through such works, satire remains a vital catalyst for change and awareness.

El Niño Jesús No Odia a los Mariquitas sparks vital conversations about homophobia and religion through satire. Its controversial yet impactful approach highlights the importance of challenging societal norms, fostering dialogue and reflection.

10.1 Final Thoughts on the Book’s Significance

El Niño Jesús No Odia a los Mariquitas is a bold, satirical work that challenges societal norms and sparks dialogue on sensitive topics like homophobia and religion. Its controversial design and adult themes, despite a childlike appearance, have fueled debates about freedom of expression and artistic intent. The free PDF version has widened its reach, making it a catalyst for conversations about tolerance and satire’s role in modern society. While divisive, the book underscores the power of humor and art to critique and provoke reflection.

minolta maxxum 7000 instruction manual

The Minolta Maxxum 7000 is an automatic SLR camera renowned for its autofocus system and ergonomic design. It revolutionized photography with advanced features like on-board film advance and metering, making it user-friendly and efficient for professionals and enthusiasts alike.

1.1 Historical Significance of the Minolta Maxxum 7000

The Minolta Maxxum 7000, released in 1985, marked a pivotal moment in photography history. It was the first SLR camera to integrate an autofocus system and motor drive into a single body, setting a new standard for innovation. This groundbreaking design influenced future camera development and earned widespread acclaim. Its introduction democratized advanced photography features, making them accessible to a broader audience. The Maxxum 7000 remains celebrated for its role in shaping modern camera technology and its enduring popularity among photographers and collectors.

1.2 Key Features of the Minolta Maxxum 7000

The Minolta Maxxum 7000 boasts a robust autofocus system, program exposure mode, and metering capabilities, making it a versatile tool for photographers. It supports single-frame and continuous shooting up to two frames per second. The camera features a data panel for easy monitoring of settings like shutter speed and film speed. Additionally, it is compatible with MAXXUM flash units and offers power rewind functionality. Its ergonomic design ensures user comfort, while its reliance on common AA batteries enhances convenience. These features solidified its reputation as a reliable and advanced SLR camera.

Key Components of the Minolta Maxxum 7000

The Minolta Maxxum 7000 features an advanced autofocus system, film advance modes, and a center-weighted metering system. Its data panel displays critical settings like shutter speed and film speed.

2.1 Autofocus System

The Minolta Maxxum 7000 features a groundbreaking autofocus system, enabling precise and rapid focusing. Utilizing advanced sensors and motorized lenses, it ensures sharp images effortlessly. This system, compatible with MAXXUM AF lenses, revolutionized photography by eliminating manual focus delays, making it ideal for dynamic shooting scenarios. Its seamless integration with other components enhances overall performance, aligning with modern photography practices and improving efficiency for professionals and enthusiasts alike.

2.2 Film Advance Modes

The Minolta Maxxum 7000 offers versatile film advance modes, catering to various shooting needs. It includes single-frame and continuous shooting options, with the latter capable of capturing up to two frames per second. Additionally, a power rewind feature allows quick and convenient film rewinding, enhancing workflow efficiency. These modes make the camera adaptable for both still photography and dynamic situations, ensuring photographers can capture moments seamlessly without missing a shot.

2.3 Metering System

The Minolta Maxxum 7000 features a center-weighted metering system, providing accurate exposure readings. It supports compatibility with Maxxum lenses, ensuring precise light measurement. The system also includes an AE Lock (AEL) button, allowing photographers to lock exposure settings for creative control. With sensitivity up to 1/1000th of a second, the metering system delivers reliable results in various lighting conditions, making it a robust tool for achieving optimal exposures effortlessly. This feature enhances the camera’s usability for both professionals and enthusiasts, ensuring high-quality images consistently.

Camera Modes and Settings

The Minolta Maxxum 7000 offers versatile modes, including Program Exposure, Manual Focus, and Single-Frame or Continuous Shooting, providing photographers with flexibility to suit various shooting scenarios and styles.

3.1 Program Exposure Mode

The Program Exposure Mode on the Minolta Maxxum 7000 simplifies photography by automatically setting both aperture and shutter speed for optimal results. This mode is ideal for quick shooting situations, allowing photographers to focus on composition and subject matter. The camera’s advanced metering system ensures balanced exposures, while the data panel displays the selected settings for user review. This mode caters to both professionals and enthusiasts, offering convenience without compromising image quality, making it a versatile option for various lighting conditions and subjects.

3.2 Manual Focus Mode

The Manual Focus Mode on the Minolta Maxxum 7000 allows photographers to take full control over focusing, enabling precise adjustments for creative or technical requirements. By switching to manual focus, the autofocus system is deactivated, and the lens ring is used to achieve sharpness. This mode is particularly useful for macro photography, portraiture, or when the autofocus struggles with complex compositions. The camera supports manual focus with a focus confirmation signal, ensuring accuracy and confidence in capturing sharp images, even in challenging lighting or low-contrast scenarios.

3.4 Single-Frame and Continuous Shooting

The Minolta Maxxum 7000 offers both single-frame and continuous shooting modes, providing flexibility for different photographic needs. In single-frame mode, the camera captures one image per press of the shutter button, ideal for precise control. Continuous shooting allows for rapid capture at up to two frames per second, perfect for action photography. This feature requires the Power Rewind accessory for efficient film advancement, enabling photographers to freeze dynamic moments effortlessly. The modes cater to both casual and professional use, enhancing creative possibilities with ease and speed.

Using the Data Panel

The data panel displays key camera settings, allowing users to monitor and adjust features like shutter speed, film speed, and mode selections for optimal photography control.

4.1 Understanding Shutter Speed and Film Speed

The Minolta Maxxum 7000’s data panel clearly displays shutter speed and film speed, essential for controlling exposure. Shutter speed determines how long the camera’s shutter remains open, while film speed (ISO) indicates the film’s sensitivity to light. Properly balancing these settings ensures optimal image quality; The camera’s metering system, which is center-weighted, helps determine the correct exposure by measuring light from the scene. Adjustments can be made using the AEL (Auto Exposure Lock) button, allowing for precise control over lighting conditions. This feature is particularly useful for achieving desired creative effects in various photography situations.

4.2 Film Speed Symbol and Data Panel Functions

The Minolta Maxxum 7000’s data panel displays a film speed symbol, indicating the ISO rating of the loaded film. This symbol, along with other exposure settings like shutter speed and aperture, helps photographers monitor and adjust their settings efficiently. The data panel also provides functions such as battery status, frame counter, and mode indicators, ensuring seamless operation. The ability to quickly reference these details enhances the shooting experience, making the Maxxum 7000 a user-friendly choice for capturing high-quality images in various lighting conditions.

Accessories for the Minolta Maxxum 7000

The Minolta Maxxum 7000 supports a range of accessories, including MAXXUM Flash units with AF, power rewind, and advanced components, enhancing functionality and versatility for photographers.

5.1 MAXXUM Flash Units with AF

The MAXXUM Flash units with AF are advanced accessories designed for the Minolta Maxxum 7000, offering precise autofocus and metering capabilities. These flash units provide enhanced lighting control, ensuring balanced exposures in various conditions. With their ergonomic design and compatibility with the camera’s autofocus system, they simplify capturing sharp, well-lit images. The units integrate seamlessly with the camera’s functionality, making them indispensable for photographers seeking professional-grade lighting solutions. Their ease of use and advanced features make them a valuable addition to the Maxxum 7000 system.

5.2 Power Rewind and Other Advanced Accessories

The Minolta Maxxum 7000 offers a Power Rewind feature, enabling rapid film rewinding without manual intervention. This accessory enhances convenience, especially for photographers needing quick turnaround. Additional advanced accessories include data backs for timestamp imprinting and remote shutter releases, minimizing camera shake. These tools expand the camera’s capabilities, catering to professional demands. The Power Rewind and complementary accessories ensure efficient workflow and precise control, making the Maxxum 7000 a versatile choice for photographers seeking advanced functionality in their workflows.

Battery and Power Management

The Minolta Maxxum 7000 requires battery power for all functions, utilizing commonly available AA batteries for convenience. Efficient power management ensures extended use in various shooting conditions, optimizing battery life and reliability to meet photographers’ needs effectively while maintaining performance and functionality across its advanced features seamlessly.

6.1 Battery Requirements and Usage

The Minolta Maxxum 7000 operates using four AA batteries, ensuring reliable power for its advanced features. It is recommended to use high-quality alkaline or nickel-cadmium batteries for optimal performance. The camera’s power management system efficiently utilizes battery life, with clear indicators on the data panel to monitor battery status. Proper battery installation and avoidance of mixing old and new batteries are crucial for consistent functionality. Regularly checking battery levels and replacing them when necessary ensures uninterrupted use during photography sessions.

6.2 Power Efficiency and Battery Life

The Minolta Maxxum 7000 is designed for power efficiency, with its advanced autofocus and metering systems optimized to minimize battery drain. The camera’s power management ensures extended battery life, allowing for hundreds of shots on a single set of batteries. Proper usage, such as turning off unnecessary features and avoiding prolonged use of the data panel, can further enhance battery longevity. Regular maintenance, like cleaning contacts and using fresh batteries, helps maintain consistent performance and reliability during photography sessions.

Advanced Features and Capabilities

The Minolta Maxxum 7000 boasts an ergonomic design for enhanced usability and compatibility with modern photography practices, ensuring a seamless and efficient shooting experience for photographers.

7.1 Ergonomic Design and Usability

The Minolta Maxxum 7000 features an ergonomic design that prioritizes comfort and ease of use. Its lightweight and intuitive controls, including the data panel and mode dials, enhance usability. The camera’s compact build and balanced grip ensure extended shooting sessions remain comfortable. Additionally, its compatibility with commonly available AA batteries adds to its practicality, making it a user-friendly option for both professionals and enthusiasts. These design elements contribute to a seamless and efficient photography experience.

7.2 Compatibility with Modern Photography Practices

The Minolta Maxxum 7000 remains compatible with modern photography practices, offering a blend of traditional and advanced features. Its 35mm film format, autofocus system, and metering modes align with contemporary techniques. Manual focus options cater to those preferring precise control. Compatibility with current flashes and lenses ensures versatility. This camera’s adaptability makes it a favorite among collectors and professionals, bridging the gap between analog and digital practices; Its enduring relevance underscores its value in today’s photography world, supported by a wealth of resources and accessories.

Troubleshooting Common Issues

The Minolta Maxxum 7000 may encounter issues like inaccurate metering or faulty autofocus. Regular cleaning of sensors and lenses can resolve these problems. Ensure proper battery function and film loading to maintain optimal performance. Addressing these common issues ensures smooth operation and high-quality results, keeping your camera in top working condition for years to come.

8.1 Resolving Focus and Metering Problems

Focus issues often arise from dirty sensors or misaligned lenses. Clean the autofocus sensor gently with a soft cloth and ensure lenses are properly attached. For metering inaccuracies, use the AEL button to adjust settings and verify film speed is correctly set. These steps help restore precise focus and accurate exposures, ensuring sharp and well-balanced images.

8.2 Addressing Film Advance and Rewind Issues

Film advance problems may occur due to improper loading or worn gears. Rewind issues can be resolved by ensuring the film is correctly seated and the rewind button is functioning. Clean the film path and check for obstructions. If issues persist, consult the manual or contact a professional for repair to prevent further damage and ensure reliable operation.

Focusing issues may arise from dirt on the autofocus sensor or improper lens alignment. Clean the sensor gently with a soft cloth and ensure lenses are securely attached. Metering inaccuracies can occur if the AEL button is not used correctly or if film speed is misconfigured. Regularly check the viewfinder for condensation or debris, as this can obstruct accurate focus and exposure readings. Additionally, ensure the mirror and prism are free from dust for optimal performance. If problems persist, consult the manual or contact a professional for assistance.

Film advance and rewind issues often stem from improper loading, jams, or worn mechanisms. If the film fails to advance, check for obstructions and ensure the film is loaded correctly; For incomplete rewinding, verify the rewind button is pressed fully. If the motorized rewind is noisy or slow, clean the film chamber and rollers; Ensure batteries are fresh, as low power can disrupt these functions. If problems persist, consult the manual or seek professional servicing to avoid damaging the camera or film.

Legacy and Impact on Photography

The Minolta Maxxum 7000, a groundbreaking model, revolutionized photography with its on-board film advance and autofocus. It influenced future designs and remains popular among collectors today.

9.1 Influence on Subsequent Camera Models

The Minolta Maxxum 7000 set a benchmark for future SLR cameras with its innovative autofocus and on-board film advance. Its ergonomic design and user-friendly interface inspired later models, integrating advanced features like matrix metering and continuous shooting. The camera’s success led to widespread adoption of autofocus technology, making it a standard in modern photography equipment. Its influence is evident in subsequent Minolta and other brands’ designs, ensuring its legacy as a pioneering device in the evolution of SLR cameras.

9.2 Popularity Among Photographers and Collectors

The Minolta Maxxum 7000 remains a favorite among photographers and collectors due to its groundbreaking features and enduring functionality. Its autofocus system, ergonomic design, and user-friendly interface made it accessible to both professionals and hobbyists. Collectors prize it for its historical significance and reliability, while photographers appreciate its compatibility with modern practices. The availability of its instruction manual as a free PDF further enhances its appeal, ensuring its continued use and admiration in the photography community.

nj transit 408 bus schedule pdf

Overview of NJ Transit 408 Bus Route

The NJ Transit 408 bus route operates between Millville and Philadelphia‚ serving Southern New Jersey communities like Glassboro and Pitman. It connects residents to essential destinations‚
offering a reliable transit option for daily commutes and travel. The route is part of NJ Transit’s extensive network‚ ensuring convenient access across the region.

Route and Stops

The NJ Transit 408 bus route spans from Millville to Philadelphia‚ providing essential connectivity between Southern New Jersey and Pennsylvania. The route includes 124 stops‚
starting from 6th St at Race St in Philadelphia and ending at Broad St at 3rd St in Millville. Key stops along the way include major intersections and transit hubs‚
serving communities such as Glassboro‚ Pitman‚ and Camden. This extensive network ensures passengers can easily access various destinations‚ including shopping centers‚
workplaces‚ and residential areas. The 408 bus route is a vital link for both daily commuters and occasional travelers‚ offering a convenient way to navigate the region.

Service Area

The NJ Transit 408 bus route primarily serves Southern New Jersey and parts of Pennsylvania‚ connecting Millville to Philadelphia. It covers key areas such as Glassboro‚ Pitman‚
and Camden in New Jersey‚ while also extending into Pennsylvania. This route is essential for residents and commuters traveling between these regions‚ offering
access to residential neighborhoods‚ commercial centers‚ and transit hubs. The 408 bus route is a vital part of NJ Transit’s network‚ ensuring reliable transportation
options for thousands of passengers daily. Its extensive coverage makes it a cornerstone for connectivity in the region‚ supporting both local and cross-state travel needs.

NJ Transit 408 Bus Schedule

The NJ Transit 408 bus schedule is available online and via the Transit app‚ offering detailed timetables for weekday‚ weekend‚ and holiday services.

Weekday Schedule

The NJ Transit 408 bus weekday schedule provides frequent service between Millville and Philadelphia‚ with departures throughout the day. The route includes 124 stops‚ ensuring access to key locations
such as Glassboro and Pitman. Buses operate regularly‚ with arrivals every 30 to 60 minutes‚ depending on the time of day. Commuters can plan their trips using
the Transit app or by downloading the PDF schedule from NJ Transit’s website. This schedule is designed to accommodate both peak and off-peak hours‚
ensuring reliable transportation for residents and visitors alike. Real-time updates are also available to help passengers stay informed about any service changes or delays.

Weekend and Holiday Schedule

The NJ Transit 408 bus operates on a modified schedule during weekends and holidays‚ with reduced frequency compared to weekdays. Passengers can expect fewer trips and longer intervals
between buses‚ typically every 60 to 90 minutes. The route still connects Millville to Philadelphia‚ serving key stops like Glassboro and Pitman‚ but with adjusted timings
to accommodate lighter demand. Holiday schedules may vary further‚ with some routes operating on a Sunday schedule or experiencing additional service changes. It’s essential for riders
to check the official NJ Transit website or the Transit app for precise weekend and holiday timetables‚ as well as any special advisories. This ensures seamless travel planning
and avoids disruptions during off-peak times.

Frequency and Timing

The NJ Transit 408 bus route operates with varying frequencies throughout the day‚ adapting to commuter demand. During peak hours‚ typically weekday mornings and afternoons‚ buses run every 20 to 30 minutes‚
ensuring reliable service for commuters. Off-peak hours‚ including midday and late evenings‚ see reduced frequency‚ with buses arriving every 45 to 60 minutes. The first departure
from Millville is around 5:00 AM‚ while the last trip from Philadelphia departs at approximately 9:00 PM. Weekends and holidays have even more spaced intervals‚ with buses
running every 60 to 90 minutes. The total travel time from Millville to Philadelphia is about 1.5 to 2 hours‚ depending on traffic and the number of stops. Riders are advised to
check the official schedule or the Transit app for exact timings and real-time updates to plan their journeys effectively.

Fares and Payment Options

NJ Transit 408 bus fares are based on zones‚ offering affordable travel options. Riders can pay using cash‚ tickets‚ or the Transit app for convenience and ease.

Zone-Based Fare System

The NJ Transit 408 bus route utilizes a zone-based fare system‚ where the cost is determined by the number of zones traveled. Each zone represents a specific geographic area‚ and as passengers cross into additional zones‚ the fare increases accordingly. This system ensures that fares are proportional to the distance traveled‚ making it equitable for all riders. By consulting the provided map on the schedule‚ passengers can easily identify the zones they will pass through and calculate their exact fare. This clear and structured pricing method helps commuters plan their journeys and budgets effectively‚ enhancing the overall transit experience.

Payment Methods

NJ Transit offers various payment methods for the 408 bus route‚ ensuring convenience for passengers. Cash payments are accepted‚ though exact change is recommended as drivers cannot provide change. Additionally‚ the NJ Transit Mobile App allows passengers to purchase tickets or passes digitally‚ reducing the need for cash transactions. Weekly rail passes are also valid for local bus trips within one zone‚ making commuting more affordable and flexible. These payment options cater to different preferences and needs‚ ensuring a seamless travel experience for all riders.

Downloading the 408 Bus Schedule PDF

Download the 408 bus schedule PDF from the NJ Transit website or Transit app. It provides offline access to timetables‚ stops‚ and service details for easy planning.

Steps to Download the Schedule

To download the 408 bus schedule PDF‚ visit the NJ Transit website and navigate to the “Schedules & Maps” section. Select “Bus” and choose route 408 from the list. Click on the “Download PDF” option to access the timetable. Alternatively‚ use the Transit app‚ where you can find the schedule under the “Routes” section. Ensure you select the correct direction‚ such as Millville to Philadelphia. Once downloaded‚ the PDF provides offline access to detailed stop information‚ arrival times‚ and service alerts‚ making it easy to plan your trip. This feature is especially useful for offline planning and quick reference.

Benefits of Using the PDF Schedule

The PDF version of the 408 bus schedule offers several advantages for passengers. It provides an offline accessible timetable‚ allowing users to plan trips without internet connectivity. The document includes detailed stop lists‚ arrival times‚ and service alerts‚ ensuring comprehensive travel information. Users can easily print the PDF for quick reference or share it with others. Additionally‚ the PDF format preserves the layout and readability of the schedule‚ making it easier to navigate compared to mobile apps. This feature is particularly beneficial for those who prefer traditional planning methods or need to reference the schedule frequently. It enhances overall transit experience by offering reliability and convenience.

Real-Time Tracking and Updates

The Transit app provides real-time tracking for the 408 bus route‚ offering live updates on arrivals‚ departures‚ and service alerts. Available on iOS and Android‚ it helps riders plan trips efficiently and stay informed about schedule changes or disruptions. This feature is essential for commuters seeking accurate and up-to-date information to ensure smooth travel experiences.

Using the Transit App for Real-Time Information

The Transit app offers real-time tracking for the NJ Transit 408 bus route‚ enabling riders to monitor live arrivals and departures. Available for iOS and Android‚ the app provides up-to-the-minute updates‚
ensuring commuters stay informed about schedule changes‚ delays‚ or service disruptions. Users can plan their trips efficiently by viewing real-time bus locations and estimating arrival times. The app also
allows passengers to set push notifications for specific routes or stops‚ keeping them alerted to any changes in service. This feature is invaluable for maintaining seamless travel experiences
and reducing wait times at bus stops. By leveraging the Transit app‚ riders can navigate the 408 route with greater ease and reliability.

Service Alerts and Advisories

Stay updated on service alerts for the 408 bus route through NJ Transit’s website or the Transit app. Receive notifications about delays‚ detours‚ or planned maintenance to plan your trip accordingly.

Importance of Checking Service Alerts

Checking service alerts is crucial for a smooth journey on the 408 bus route. Alerts provide real-time updates on delays‚ detours‚ or service changes due to weather‚ traffic‚ or mechanical issues. By staying informed‚ passengers can adjust their travel plans accordingly‚ avoiding unexpected disruptions. NJ Transit offers these alerts through their website‚ mobile app‚ and social media‚ ensuring riders are always prepared. Regularly checking alerts helps minimize travel stress and ensures timely arrival at destinations. This proactive approach is essential for commuters relying on the 408 route for daily travel between Millville‚ Philadelphia‚ and surrounding areas.

The NJ Transit 408 bus route is a vital transportation link connecting Millville‚ Philadelphia‚ and surrounding communities. Its reliable schedule and extensive network ensure convenient travel for thousands of passengers daily. By utilizing the downloadable PDF schedule and real-time tracking through the Transit app‚ commuters can plan their journeys efficiently. The zone-based fare system and various payment options make travel affordable and accessible. Regular service alerts and updates help passengers stay informed‚ minimizing disruptions. Whether for work‚ education‚ or leisure‚ the 408 route plays a crucial role in meeting the transportation needs of Southern New Jersey residents‚ offering a dependable and essential service.

cessna 172p service manual

The Cessna 172P Service Manual is a comprehensive guide for maintaining and inspecting the aircraft‚ ensuring safety and compliance with regulatory standards for pilots and technicians.

1.1 Overview of the Service Manual

The Cessna 172P Service Manual is a detailed guide covering maintenance‚ inspection‚ and repair procedures for the aircraft. It applies to models manufactured from 1969 to 1976 and includes sections on airframe‚ engine‚ avionics‚ and electrical systems. The manual provides essential information for technicians and pilots to ensure compliance with safety standards and regulatory requirements. It outlines routine maintenance tasks‚ inspection schedules‚ and troubleshooting steps. Additionally‚ it contains diagrams‚ charts‚ and part lists for accurate repairs and replacements. This manual is a critical resource for maintaining the aircraft’s airworthiness and ensuring reliable performance. It is supplemented by service letters and bulletins for updates and modifications.

1.2 Key Features of the Cessna 172P Model

The Cessna 172P is a four-seat‚ single-engine aircraft known for its robust design and versatility. It features a Lycoming O-360-A4M engine‚ delivering 180 horsepower‚ and is equipped with a fixed tricycle landing gear. The model is renowned for its stability‚ making it an ideal trainer for flight schools. Its durable construction and reliable performance have made it a popular choice for both training and personal use. The aircraft’s avionics and electrical systems are designed for ease of operation and safety. The Cessna 172P also includes a comprehensive service manual covering maintenance procedures for years 1977-1986‚ ensuring longevity and airworthiness. Its combination of power‚ reliability‚ and ease of maintenance solidifies its reputation as a dependable aircraft.

Maintenance Procedures and Guidelines

The manual details service intervals‚ inspection checks‚ and repair guidelines for the Lycoming O-360-A4M engine‚ ensuring optimal performance and compliance with safety regulations.

2.1 Routine Maintenance Tasks

The Cessna 172P Service Manual outlines essential routine maintenance tasks‚ including oil changes‚ tire pressure checks‚ and propeller inspections‚ to ensure aircraft airworthiness. Regular lubrication of moving parts and inspection of control surfaces are emphasized to prevent wear and tear. Additionally‚ the manual specifies intervals for replacing air filters and spark plugs‚ aligning with manufacturer recommendations. These tasks are designed to be performed by certified mechanics‚ adhering to safety protocols and using approved tools. Compliance with these routines is crucial for maintaining the aircraft’s reliability and performance‚ as outlined in the manual’s detailed service schedules and checklists.

2.2 Engine Maintenance and Inspection

The Cessna 172P Service Manual details engine maintenance procedures for the Lycoming O-360-A4M engine‚ including routine inspections of cylinders‚ valves‚ and spark plugs. Compression tests are recommended to identify potential issues early. Oil and filter changes are specified at regular intervals to ensure engine longevity. The manual also outlines spark plug replacement procedures and air filter maintenance to optimize performance. Detailed guidelines for inspecting engine components‚ such as the crankcase and cooling system‚ are provided to prevent overheating and wear. Adherence to these procedures ensures the engine operates efficiently‚ maintaining reliability and safety during flight operations‚ as outlined in the manual’s comprehensive maintenance schedules.

Avionics and Electrical Systems

The Cessna 172P Service Manual provides detailed guidance on avionics system operation‚ electrical circuit diagrams‚ and troubleshooting procedures to ensure reliable performance of navigation and communication equipment.

3.1 Avionics System Overview

The Cessna 172P Service Manual provides a detailed overview of the avionics system‚ including navigation‚ communication‚ and flight instruments. It covers the installation‚ operation‚ and troubleshooting of key avionics components such as GPS‚ VOR‚ and intercom systems. The manual also includes diagrams and charts to help technicians understand the wiring and integration of these systems. Additionally‚ it outlines the specifications and compatibility of various avionics units‚ ensuring compliance with regulatory standards. This section is essential for maintaining and upgrading the aircraft’s electrical and avionics systems‚ ensuring optimal performance and safety during flight operations. Proper adherence to the guidelines ensures reliable functionality of all avionics components.

3.2 Electrical Circuit Diagrams and Repairs

The Cessna 172P Service Manual includes detailed electrical circuit diagrams‚ enabling technicians to identify and repair faults efficiently. These diagrams illustrate the wiring and connections for systems such as lighting‚ avionics‚ and navigation. The manual provides step-by-step procedures for troubleshooting electrical issues‚ including testing circuits and replacing faulty components. It also outlines safety precautions to prevent damage or injury during repairs. Additionally‚ the guide specifies tools and materials required for electrical work‚ ensuring compliance with manufacturer standards. By following the manual’s instructions‚ technicians can maintain the aircraft’s electrical systems in optimal condition‚ ensuring reliability and performance. Proper electrical system maintenance is critical for flight safety and operational efficiency.

Parts Catalog and Replacement

The Cessna 172P Service Manual provides a detailed parts catalog‚ ensuring compatibility and ease of replacement for all aircraft components‚ with clear ordering instructions and specifications.

4.1 Identifying Replacement Parts

Identifying replacement parts for the Cessna 172P involves referencing the detailed parts catalog in the service manual. Each component is listed with specific part numbers and descriptions‚ ensuring accuracy. The manual categorizes parts by system‚ such as avionics‚ engine‚ and airframe‚ making it easier to locate the correct item. Additionally‚ diagrams and cross-references help technicians verify compatibility before ordering. It’s crucial to use genuine or approved parts to maintain aircraft performance and safety. The catalog also includes information on suppliers and ordering procedures‚ streamlining the replacement process for maintenance professionals. Always refer to the latest revision of the manual for updated part information.

4.2 Parts Compatibility and Ordering

Ensuring parts compatibility is critical for the Cessna 172P’s performance and safety. The service manual provides detailed specifications and cross-reference charts to verify component compatibility. When ordering‚ technicians must use the exact part numbers listed in the catalog to avoid mismatches. Genuine Cessna parts or approved alternatives are recommended to maintain compliance with airworthiness standards. The manual also outlines procedures for ordering through authorized suppliers or Cessna dealers‚ ensuring timely delivery and authenticity. Additionally‚ it’s essential to review the manual’s revision history for updates on part numbers or compatibility changes. Always double-check orders against the parts catalog to prevent errors during maintenance or repairs.

Inspection and Troubleshooting

Regular inspections ensure the Cessna 172P’s airworthiness. The manual provides detailed checklists and diagnostic steps to identify and address potential issues promptly and effectively.

5.1 Pre-Flight Inspection Checklist

The Cessna 172P Service Manual outlines a detailed pre-flight inspection checklist to ensure the aircraft is airworthy. This includes examining the exterior for damage‚ checking control surfaces‚ tires‚ and brakes. The checklist also covers interior components like seat belts‚ instruments‚ and avionics. Pilots must verify fuel levels‚ oil levels‚ and the condition of the propeller and engine. Electrical systems‚ navigation lights‚ and communication equipment are also inspected. The checklist is divided into sections for ease of use‚ ensuring no critical component is overlooked. Adhering to this process is essential for safe flight operations and compliance with maintenance standards.

5.2 Common Issues and Troubleshooting

The Cessna 172P Service Manual addresses common issues such as engine oil leaks‚ avionics malfunctions‚ and electrical system glitches. It provides step-by-step troubleshooting guides to identify and resolve problems efficiently. For example‚ unusual engine vibrations may indicate propeller imbalance or faulty spark plugs. The manual also covers navigation and communication system failures‚ offering diagnostic procedures to isolate faults. Additionally‚ it includes solutions for common electrical issues‚ such as faulty circuit breakers or wiring problems. By following the manual’s guidelines‚ technicians can quickly pinpoint and repair issues‚ ensuring the aircraft remains airworthy and operational. This section is invaluable for maintaining safety and minimizing downtime.

Safety and Compliance

The Cessna 172P Service Manual emphasizes adherence to safety protocols and regulatory standards‚ ensuring all maintenance and inspections comply with aviation guidelines to prevent accidents and ensure airworthiness.

6.1 Safety Guidelines for Maintenance

The Cessna 172P Service Manual outlines critical safety guidelines to ensure secure maintenance practices. Adherence to these protocols is essential for preventing accidents and maintaining airworthiness. Technicians must follow established safety procedures‚ such as proper tool usage and adherence to service letters like SE73-25‚ which covers free-play limits‚ inspections‚ and repairs. Additionally‚ the manual emphasizes the importance of using original Cessna documentation to avoid reliance on unofficial translations or interpretations. Regular reviews of safety updates and bulletins are also recommended to stay informed about potential risks and improvements. By following these guidelines‚ maintenance teams can ensure the aircraft remains safe for operation and compliant with aviation standards.

  • Always refer to the official service manual for accurate procedures.
  • Use approved tools and equipment to prevent damage or malfunctions.
  • Stay updated with the latest safety advisories and bulletins.

6.2 Regulatory Compliance and Documentation

Ensuring regulatory compliance is crucial for the Cessna 172P‚ requiring adherence to aviation standards and documentation protocols. The service manual emphasizes reliance on official Cessna documents‚ such as service letters and bulletins‚ to maintain airworthiness. Proper record-keeping‚ including detailed maintenance logs and inspection reports‚ is essential for compliance. Technicians must verify that all repairs and modifications align with Federal Aviation Regulations (FARs) and manufacturer guidelines. Additionally‚ the manual highlights the importance of using approved parts and following certification processes. Regular updates and revisions ensure the aircraft remains compliant with evolving regulations. Cessna Dealers provide updated materials‚ such as the Worldwide Customer Care Directory‚ to support compliance efforts.

  • Use only approved parts and materials.
  • Maintain accurate and detailed maintenance records.
  • Refer to official Cessna documentation for compliance.

Additional Resources and References

Additional resources include supplementary manuals‚ online forums‚ and Cessna Dealers for updated service letters and parts catalogs‚ ensuring comprehensive support for maintenance and operation.

7.1 Supplementary Manuals and Guides

Supplementary manuals and guides provide in-depth information on specific systems and components of the Cessna 172P. These resources include detailed avionics guides‚ engine maintenance handbooks‚ and structural repair manuals. They are essential for technicians and owners seeking comprehensive knowledge beyond the standard service manual. Additionally‚ paint application manuals and parts catalogs offer practical advice for exterior maintenance and component replacement. These supplementary materials ensure that all aspects of the aircraft are covered‚ from avionics systems to exterior finishes‚ making them invaluable for thorough maintenance and customization of the Cessna 172P.

7.2 Online Forums and Communities for Support

Online forums and communities provide invaluable support for Cessna 172P owners and technicians. Platforms like the Cessna Owner Organization forum and Plane & Pilot discussions offer real-time advice and troubleshooting tips. These communities are rich with shared experiences‚ allowing users to learn from others who have encountered similar issues. Additionally‚ many forums host technical discussions on avionics‚ engine maintenance‚ and compliance standards. Interactive tools‚ such as diagrams and video tutorials‚ are often shared to aid in complex repairs. These online resources complement the service manual‚ fostering a collaborative environment for resolving challenges and optimizing aircraft performance. They serve as a vital extension of the official documentation‚ enhancing overall maintenance efficiency and pilot confidence.

tank top logo placement guide

Logo placement on tank tops is crucial for brand visibility and aesthetic appeal․ Proper positioning enhances design impact, ensuring logos stand out while maintaining a balanced look․ This guide explores optimal print locations, sizing, and best practices to help achieve professional results․

Standard Print Locations for Tank Top Logos

Common print locations include chest, back, sleeves, and hem․ Each area offers unique visibility and style benefits, ensuring logos are prominently displayed while maintaining garment functionality․

Chest Placement

Chest placement is a popular choice for tank top logos, typically positioned 2-3 inches below the shoulder seam․ This central location ensures high visibility, making it ideal for branding․ The chest area is eye-catching and maintains a clean, professional look․ For optimal impact, logos should be sized proportionally to the garment, avoiding overly large designs that may appear overwhelming․ This placement is versatile, suitable for both casual and athletic wear․

Back Placement

Back placement offers a bold, eye-catching alternative to chest logos, often centered between the shoulder blades․ This location is ideal for larger designs or intricate details, making it popular for athletic and casual wear․ Logos can be positioned slightly lower for a modern look․ The back provides ample space for creative expression, ensuring visibility whether the tank top is worn alone or layered․ This placement is versatile and works well for both subtle and statement designs․

Sleeve Placement

Sleeve placement is a trendy and functional option for tank top logos․ Typically positioned 2-3 inches below the shoulder seam, this location ensures the logo remains visible whether the wearer’s arms are still or in motion․ It’s ideal for smaller designs or brand names, adding a subtle yet stylish touch․ Sleeve logos are popular in athletic and fashion apparel, offering a modern aesthetic while maintaining comfort and practicality․ This placement works well for both single-color and intricate designs․

Hem Placement

Hem placement offers a subtle yet stylish way to incorporate branding or design elements․ Positioned near the bottom edge of the tank top, this location is ideal for small logos or text․ It provides a discreet branding option without overwhelming the design․ Hem logos are often used for secondary branding or taglines, complementing other design elements․ This placement works well for minimalistic designs and ensures the logo remains visible without interfering with the main artwork․

Upper Back Placement

Upper back placement positions logos slightly above the shoulder line, offering a modern and trendy look․ This location is ideal for small to medium-sized designs, as it remains visible when the wearer moves or turns․ It complements front placements without overwhelming the design․ Ensure symmetry by centering the logo horizontally․ This placement works well for athletic or fashion-forward designs, providing a balanced and stylish branding option that enhances overall aesthetics․

Design Size and Dimensions for Tank Tops

Optimal logo sizes for tank tops range from 2-4 inches tall, ensuring visibility without overwhelming the design․ Typical dimensions are 8-10 inches wide for chest placements․

Minimum and Maximum Logo Sizes

Logo sizes for tank tops typically range from 2 to 4 inches in height, with chest logos commonly spanning 8-10 inches in width․ Smaller logos, like sleeve placements, are around 1-2 inches tall․ Maximum sizes should not overwhelm the garment, ensuring a balanced, professional look․ Proper sizing ensures visibility and aesthetic appeal, avoiding designs that are too subtle or overly dominant․ These guidelines help maintain a clean, attractive appearance for any design․

Optimal Logo Dimensions for Visibility

For maximum visibility, logos on tank tops should be sized between 3-4 inches in height for chest placements and 2-3 inches for sleeves․ These dimensions ensure clarity without overwhelming the garment․ Standard logo widths typically range from 8-10 inches for chest logos and 4-6 inches for sleeve designs․ Optimal sizing strikes a balance between prominence and subtlety, ensuring the logo is easily noticeable while maintaining a clean, professional appearance on the tank top․

Choosing the Right Font for Logo Placement

Selecting the right font ensures your logo stands out while maintaining readability․ Different fonts convey unique brand identities, making font choice crucial for visual impact and messaging clarity․

Sans-Serif Fonts for Clarity

Sans-serif fonts are ideal for tank top logos due to their clean, modern aesthetic and high readability․ These fonts lack serifs, making them appear simpler and more contemporary․ They work well for small or large designs, ensuring clarity even from a distance․ Sans-serif fonts like Helvetica or Arial are popular choices as they maintain professionalism while offering versatility in branding․ Their straightforward design ensures the logo remains legible on various fabric types and colors, making them a practical option for tank top logo placement․

Script Fonts for Aesthetic Appeal

Script fonts add elegance and artistic flair to tank top logos, making them ideal for creative or vintage branding․ These fonts mimic handwritten styles, offering a unique and sophisticated look․ However, their intricate details may reduce readability at smaller sizes․ Script fonts are best used for short text or when aiming for a distinctive aesthetic, ensuring the design aligns with the brand’s artistic vision while maintaining balance with the tank top’s simplicity․

Bold Fonts for Maximum Visibility

Bold fonts are ideal for tank top logos requiring maximum visibility․ Their thick strokes and strong lines ensure readability from a distance, making them perfect for chest or back placements․ Bold fonts are particularly effective for athletic or streetwear brands aiming to make a statement․ However, they should be used sparingly to avoid overwhelming the design․ Proper spacing and contrast further enhance their impact, ensuring the logo remains clear and professional․ Bold fonts are a reliable choice for impactful branding on tank tops․

Best Practices for Logo Placement

Ensure logos are centered, symmetrically aligned, and spaced evenly from edges for a polished look․ Test designs on mock-ups to confirm aesthetic appeal and professional finish, enhancing brand identity effectively․

Symmetry in Logo Positioning

Symmetry is key for a visually appealing logo placement․ Ensure the logo is centered and evenly spaced from the edges of the tank top․ Measure carefully to align the design perfectly, avoiding asymmetrical placement․ Symmetry enhances professionalism and brand presentation, making the design look intentional․ Use digital mock-ups or physical samples to verify alignment before printing․ Proper symmetry ensures the logo stands out while maintaining a balanced, polished appearance on the garment․

Spacing Between Logo and Edges

Proper spacing between the logo and edges ensures a clean, professional look․ Maintain at least 1-2 inches of space around the logo to avoid overwhelming the design․ This margin prevents the logo from appearing cramped, especially on larger prints․ Measure from the seams and edges to ensure uniformity․ Adequate spacing enhances readability and visual appeal, making the logo stand out without cluttering the tank top’s design․ Consistent spacing is essential for a polished finish․

Contrast for Better Visibility

Contrast is key to ensuring logos are easily visible on tank tops․ Choose colors that sharply differ from the garment’s background to enhance readability․ For example, dark logos on light fabrics or light logos on dark fabrics create optimal visibility․ High contrast also improves aesthetic appeal, making the design more professional and eye-catching․ Ensure the logo’s colors are vibrant and distinct to stand out effectively and capture attention immediately․

Tools for Visualizing Logo Placement

Digital mock-ups and physical samples are essential tools for visualizing logo placement․ They allow precise previews of design positioning, ensuring optimal alignment and aesthetic appeal before production․

Digital Mock-Ups

Digital mock-ups are a powerful tool for previewing logo placement on tank tops․ Using software, designers can create realistic simulations, allowing for precise adjustments in size, position, and alignment․ This method saves time by identifying potential issues before printing, ensuring designs look professional and well-integrated․ It also enables quick iterations, making it easier to achieve the desired aesthetic without physical prototypes․

Physical Samples for Accuracy

Physical samples provide a tactile way to verify logo placement accuracy on tank tops․ They allow direct inspection of print quality, alignment, and how the design interacts with fabric․ This step is essential for ensuring the final product meets expectations, as digital previews may not fully capture texture or color accuracy․ Testing on actual garments helps catch issues early, preventing costly reprints and ensuring customer satisfaction․

Measuring for Precision

Accurate measurements ensure proper logo alignment and placement on tank tops․ Use rulers or templates to mark precise distances from seams and edges, avoiding misalignment issues․

Logo Size Specifications

Logo size specifications are critical for tank top placement․ Typically, logos range from 3 to 12 inches wide, depending on the design and desired impact․ For chest logos, a standard size is 8-10 inches wide, positioned 2-3 inches below the shoulder seam․ Ensure the logo is proportional to the tank top’s dimensions for a balanced look․ Using precise measurements guarantees the design is neither too small nor overwhelming, maintaining visual appeal and clarity․

Distance from Seams and Edges

Ensuring proper distance from seams and edges is essential for a polished look․ Logos should be placed at least 1-2 inches away from tank top seams to avoid appearing cramped․ Similarly, maintain a consistent margin from the edges to prevent the design from overwhelming the garment․ This spacing ensures the logo stands out clearly while maintaining a balanced, professional appearance․ Proper alignment and clearance enhance both aesthetics and functionality․

Preparing Files for Printing

High-resolution files with proper color accuracy are essential for crisp prints․ Ensure designs are saved in formats like PNG or Vector for optimal quality and scalability․

High-Resolution Requirements

High-resolution files are critical for sharp, professional-looking prints․ Logos should be at least 300 DPI to prevent pixelation․ Using vector graphics ensures scalability without loss of quality․ Ensure files are saved in formats like PNG or Vector for optimal clarity․ Avoid low-resolution images, as they may appear blurry when printed․ Always preview designs at full size to check for pixelation before sending to print․ This ensures your tank top logos look crisp and professional․

Color Accuracy and Bleed

Ensuring color accuracy is vital for professional results․ Use CMYK color mode and Pantone matching for consistent hues․ A 0․125-inch bleed around designs prevents white edges during cutting․ Proof files carefully to avoid color shifts․ Proper bleed ensures seamless printing, while accurate colors maintain brand integrity․ Always review and adjust colors before finalizing files for printing․ This ensures logos appear vibrant and precisely as intended on the tank top fabric․

Common Mistakes to Avoid

Avoid oversizing logos, as they may overwhelm the design․ Ensure proper alignment and spacing to maintain a balanced look․ Incorrect placement can make the logo less visible or unprofessional․

Incorrect Logo Sizing

Incorrect logo sizing can significantly impact the overall design․ A logo that is too large may overwhelm the tank top, while one that is too small might be barely noticeable․ Proper sizing ensures the logo is visible without being overpowering․ It’s essential to consider the tank top’s dimensions and the logo’s complexity when determining the ideal size for a balanced look․

Overcomplicating Design Layouts

Overcomplicating design layouts can detract from the overall appeal of a tank top․ Busy or cluttered designs may overwhelm the viewer, making the logo less effective․ Simplicity is key; clean lines and minimal elements ensure the logo stands out․ Avoid excessive text or intricate details that might confuse the message․ A straightforward design ensures clarity and professionalism, making the brand more memorable and visually appealing․

Troubleshooting Logo Placement Issues

Common issues like misalignment or incorrect sizing can ruin a design․ Adjust measurements, ensure symmetry, and use digital tools to preview placement before printing for accurate results․

Fixing Alignment Problems

Alignment issues can be resolved by measuring from seams and edges․ Use digital mock-ups to preview placement and adjust as needed․ Ensure symmetry by centering logos horizontally and vertically․ Test on physical samples to confirm accuracy․ If misaligned, reposition the design in the software and reprint․ High-resolution vectors help maintain clarity․ Always double-check measurements before final printing to avoid costly mistakes and ensure professional results․

Addressing Fading or Peeling

To prevent logo fading or peeling, use high-resolution files and ensure proper ink adhesion․ Test designs on physical samples to identify issues early․ Avoid overcomplicating layouts, as intricate details may peel faster․ Choose durable, high-quality inks and fabrics․ Ensure color accuracy and bleed settings are correct․ Regularly inspect prints for wear and tear․ Addressing these factors ensures logos remain vibrant and intact, maintaining a professional appearance over time․

Effective tank top logo placement combines strategic positioning, proper sizing, and thoughtful design․ By avoiding common mistakes and utilizing tools like digital mock-ups, you can achieve professional results․ Ensuring high-resolution files, correct color accuracy, and durable materials will enhance logo longevity․ Follow best practices for symmetry, spacing, and contrast to create visually appealing designs․ With careful planning and execution, your tank top logos will stand out and leave a lasting impression․

deja de ser tu pdf gratis

This transformative book explores the connection between the mind and reality, offering practical tools for personal growth and self-improvement through meditation and neuroscience․

Overview of the Book and Its Author

Deja de Ser Tú (Stop Being You) by Dr․ Joe Dispenza is a life-changing guide that explores the mind-reality connection․ Dispenza, a renowned neuroscientist and author, shares insights on transforming habits and beliefs to create a new reality․ The book is structured in three parts, focusing on breaking old patterns and embracing a new destiny․ Dispenza’s expertise in neuroscience and personal development makes this work a powerful tool for those seeking self-improvement and mindfulness․ His work has inspired millions globally, solidifying his reputation as a leader in the field of personal transformation․

The Main Theme: Mind and Reality Connection

The central theme of Deja de Ser Tú revolves around the powerful link between the mind and reality․ Dr․ Joe Dispenza explains how thoughts and emotions shape our experiences, emphasizing that by changing our mindset, we can redefine our lives․ He combines neuroscience and quantum physics to illustrate how consciousness influences reality, offering practical steps to break free from limiting habits and unlock human potential․ This concept is foundational, encouraging readers to embrace their role as creators of their own destiny through focused intention and meditation․

Structure of the Book

The book Deja de Ser Tú is structured into three parts: breaking old habits, rewriting the brain, and creating a new reality through meditation and intention․

Three Parts of the Book

Deja de Ser Tú is divided into three transformative parts․ The first part focuses on recognizing and breaking free from limiting habits and beliefs․ The second part delves into rewriting the brain’s programming through advanced meditation techniques․ The third part guides readers in creating a new reality by aligning their thoughts, emotions, and actions with their desired future․ This structured approach ensures a comprehensive journey of self-discovery and empowerment, enabling readers to unlock their full potential and embrace lasting change․

Key Concepts and Takeaways

Deja de Ser Tú emphasizes the mind’s power to reshape reality, offering practical steps to break free from limiting habits and emotions․ It teaches how to rewire the brain through meditation and focused intention, aligning thoughts with desired outcomes․ Readers gain insights into the neuroscience of personal transformation and the role of quantum physics in manifesting reality․ The book provides tools to overcome self-imposed boundaries and unlock human potential, blending scientific principles with spiritual wisdom to foster profound, lasting change and empowerment․

Scientific and Philosophical Foundations

The book blends neuroscience, quantum physics, and meditation, showing how the mind shapes reality through focused intention and brain rewiring, supported by scientific and spiritual insights․

The Role of Neuroscience in Personal Transformation

Neuroscience plays a pivotal role in “Deja de Ser Tú” by explaining how the brain can be rewired to break limiting habits and embrace new realities․ Dispenza emphasizes the power of neuroplasticity, showing how focused intention and meditation can reprogram the brain’s “hardware” and “software․” By understanding the neural mechanisms behind thought patterns and emotional responses, readers gain practical tools to transform their lives․ This scientific approach empowers individuals to move beyond old identities and create a new, fulfilling reality rooted in self-awareness and intentional change․

Quantum Physics and Its Relation to Reality Creation

Dispenza connects quantum physics to reality creation, explaining how consciousness influences the quantum field, a vast energy field of infinite possibilities․ By focusing intentions and emotions, individuals can align with this field to manifest desired outcomes․ The book highlights the observer effect, where awareness shapes reality, and suggests that belief and focus can collapse quantum possibilities into physical experiences․ This blend of science and spirituality empowers readers to harness their minds as creative tools, transforming thoughts into tangible reality through intentional alignment with quantum principles․

Practical Steps for Transformation

Dispenza outlines a 21-day meditation program to rewire the brain, helping readers break habits and align thoughts and emotions to create a new reality․

Meditation and Its Role in Changing Reality

Meditation is a cornerstone of transformation in “Deja de Ser Tú․” By focusing on specific techniques, readers can rewire their brains to align emotions and thoughts, creating a new reality․ Regular practice helps break old habits and fosters a mindset that embraces change․ Dispenza emphasizes that meditation isn’t just relaxation but a powerful tool to reshape one’s life․ Through consistent effort, individuals can harness their mental energy to manifest their desires and live a more fulfilling life․

21-Day Meditation Program: A Detailed Guide

The book introduces a structured 21-day meditation program designed to help readers redefine their reality․ Each week focuses on specific techniques: the first week on introductory preparation, the second on recognizing and admitting limitations, and the third on reprogramming thoughts and emotions․ Daily exercises guide users through mental and emotional transformations, aiming to break old habits and create a new, empowered reality․ This practical approach ensures gradual, lasting change, making the program accessible and impactful for those committed to their personal evolution․

Benefits of Reading “Deja de Ser Tú”

The book offers profound personal growth, helping readers break limiting habits and embrace change․ It enhances emotional intelligence, fosters mindfulness, and empowers individuals to reshape their reality through meditation․

Personal Growth and Self-Improvement

“Deja de Ser Tú” focuses on transforming your life by changing your mindset and breaking free from limiting habits․ The book provides practical tools to reshape your reality․

By combining neuroscience and meditation, it helps readers achieve personal growth, overcome emotional barriers, and develop a deeper understanding of their potential for self-improvement and empowerment․

Emotional Intelligence and Mindfulness

“Deja de Ser Tú” emphasizes the importance of emotional intelligence in reshaping reality․ By understanding and managing emotions, readers can break free from negative patterns and cultivate mindfulness․ The book offers practical techniques to enhance self-awareness, fostering a deeper connection between thoughts, emotions, and actions․ Through meditation and mindful practices, individuals can achieve emotional balance and inner peace, ultimately creating a more fulfilling and purposeful life․

Downloading the PDF for Free

The book Deja de Ser Tú is available for free download in PDF format from various online platforms, including Google Drive and Z-Library, without requiring registration․

Where to Find the Free PDF Version

The free PDF of Deja de Ser Tú can be found on platforms like Google Drive, Z-Library, and various file-sharing sites․ Visit Google Drive or Z-Library to access the book without registration․ Additionally, websites like Facilitadores Alfa and Bookey offer downloadable versions․ Ensure to verify the source for safety and reliability when downloading․

How to Access the Book Without Registration

To access Deja de Ser Tú without registration, visit platforms like Google Drive or Z-Library, where the PDF is freely available․ Search for the title, click the download link, and save the file to your device․ Ensure the source is reliable to avoid malicious content․ This method allows easy access without creating an account, making it convenient for readers worldwide․

Reader Reviews and Feedback

Readers praise Deja de Ser Tú for its insightful connection between emotions and reality, calling it a life-changing guide for personal and spiritual growth․

What Readers Are Saying About the Book

Readers describe Deja de Ser Tú as a transformative experience, praising its ability to connect emotions and reality․ Many highlight its practical tools for personal growth, such as meditation techniques․ The book is often called life-changing, offering insights into breaking habits and creating a new reality․ Fans appreciate its accessible language and the empowering message that mindset shapes destiny․ The availability of the free PDF has made it widely accessible, inspiring readers globally to embrace change and redefine their lives through mindful practices․

Impact of the Book on Readers’ Lives

Readers report profound life changes after reading Deja de Ser Tú, citing its ability to redefine their mindset and emotional well-being․ Many credit the book with helping them break free from limiting habits and embrace a more empowered reality․ The practical tools and meditative techniques have inspired tangible transformations, fostering personal growth and self-awareness․ The free PDF availability has made these insights accessible to a global audience, leading to widespread positive impact and a renewed sense of purpose in many lives;

Joe Dispenza’s Deja de Ser Tú offers profound insights into transforming reality through the mind․ Its free PDF availability has empowered countless readers worldwide․

Final Thoughts on the Book’s Value

Deja de Ser Tú by Joe Dispenza is a life-changing guide that bridges neuroscience and spirituality․ Its practical tools, such as the 21-day meditation program, empower readers to reshape their reality․ The book’s accessibility in free PDF formats has made its transformative insights reachable to a global audience․ By focusing on mind-reality connections, it challenges readers to break limiting habits and embrace their true potential․ This empowering book is a must-read for anyone seeking personal growth and a deeper understanding of their inner power․

Encouragement to Start Reading

Embark on a transformative journey with Deja de Ser Tú․ Download the free PDF and discover how to reshape your reality through meditation and mindset shifts․ Joe Dispenza’s insights are accessible and actionable, offering a clear path to personal growth․ Don’t miss this opportunity to unlock your potential and embrace a new way of thinking․ Start reading today and begin your journey toward a more empowered, mindful, and fulfilling life․ The tools you need for change are just a page away․

jeff nippard program pdf free download

Jeff Nippard’s workout programs are highly sought after for their scientifically-backed approaches to muscle growth and strength. His structured plans, including Upper/Lower splits and arm hypertrophy, cater to diverse fitness goals, making them popular among lifters worldwide.

Who is Jeff Nippard?

Jeff Nippard is a renowned professional natural bodybuilder, powerlifter, and science communicator. With over 2 million YouTube subscribers, he is a trusted figure in the fitness community, known for his evidence-based training and nutrition advice. Nippard’s programs are designed to optimize muscle growth and strength, making them popular among serious lifters. His expertise spans various training styles, including hypertrophy and strength-focused routines. By combining scientific principles with practical guidance, Jeff Nippard has become a go-to resource for individuals seeking effective and sustainable fitness plans. His programs are widely accessible, including PDF formats, which have been shared across platforms like Google Drive, making his workouts reachable to a global audience.

Why Are His Programs Popular?

Jeff Nippard’s workout programs are popular due to their scientifically-backed, structured approach to fitness. His plans, such as the Upper/Lower split and arm hypertrophy program, are designed for both effectiveness and accessibility. The availability of free PDF downloads on platforms like Google Drive has made his programs widely accessible, contributing to their popularity. Additionally, Nippard’s engaging content and community interaction foster trust and motivation among users. His focus on sustainable muscle growth and strength gains aligns with the goals of many fitness enthusiasts, making his programs a preferred choice for those seeking reliable and results-driven training guidance. The combination of scientific rigor and practical advice has solidified his reputation as a leading figure in the fitness industry.

Structure of Jeff Nippard’s Programs

Jeff Nippard’s programs feature a variety of training splits, including Upper/Lower, Full-Body, and specialized arm hypertrophy plans, designed to cater to different fitness preferences and goals.

Upper/Lower Body Split

The Upper/Lower split is a cornerstone of Jeff Nippard’s training philosophy, dividing workouts into upper and lower body days. This approach allows for balanced development, targeting major muscle groups like chest, shoulders, and triceps on upper days, while lower days focus on legs, glutes, and core. The program often includes variations, such as a 4-day split, enabling lifters to optimize both strength and hypertrophy. By alternating between upper and lower sessions, individuals can maximize recovery and progressive overload, making it a flexible and effective choice for intermediate to advanced trainees seeking consistent muscle growth and improved overall athleticism.

Full-Body Workout Plans

Jeff Nippard’s full-body workout plans are designed for versatility and accessibility, catering to those who prefer a comprehensive approach. These programs typically involve training each major muscle group 2-3 times per week, ensuring balanced development. The routines are structured to be efficient, often requiring minimal equipment, making them ideal for home workouts or travelers. With a focus on progressive overload and scientific principles, these plans are tailored to promote both strength and hypertrophy. They are periodized to avoid plateaus and can be adapted to different fitness levels, offering a practical solution for consistent muscle growth. This approach is particularly popular among individuals seeking a straightforward, no-nonsense way to stay fit without compromising on results.

Arm Hypertrophy Program

Jeff Nippard’s Arm Hypertrophy Program is a specialized plan designed to maximize muscle growth in the biceps, triceps, and forearms. The program incorporates a combination of compound lifts and isolation exercises, emphasizing progressive overload to stimulate hypertrophy. It includes detailed workout routines, sets, reps, and weight progression strategies tailored specifically for arm development. The program is popular among lifters seeking targeted results without neglecting overall muscle balance. Available in PDF format, it provides a clear, structured approach to achieving stronger, more defined arms. Many users appreciate its focus on scientific principles and practical application, making it a go-to choice for those looking to enhance their arm workouts effectively.

Key Features of the Programs

Jeff Nippard’s programs emphasize structured workout plans, weight progression strategies, and a focus on muscle growth and strength gains, ensuring effective and customizable training experiences.

Weight Progression Plans

Jeff Nippard’s programs incorporate detailed weight progression plans to ensure continuous strength gains. These plans typically involve gradual increases in load, allowing muscles to adapt and grow effectively. The structured approach helps lifters avoid plateaus, with clear guidelines on when and how to progress. The PDF guides provide specific recommendations, making it easier for users to track their progress and adjust their training accordingly. This systematic method ensures that individuals can maximize their potential, whether they’re focusing on hypertrophy or strength development. The plans are customizable, catering to different fitness levels and goals, making them accessible for both beginners and advanced trainees.

Muscle Growth and Strength Gains

Jeff Nippard’s programs prioritize muscle growth and strength gains through scientifically-backed training protocols. His plans emphasize progressive overload and periodized templates to optimize hypertrophy. The structured workouts target all major muscle groups, ensuring balanced development. By focusing on compound movements and accessory exercises, the programs help users achieve significant strength improvements. Nippard’s approach also highlights the importance of consistency and intensity, providing clear guidelines to avoid plateaus. The PDF guides offer detailed routines tailored for different fitness levels, making it easier for individuals to achieve their goals. His programs are widely praised for their effectiveness in delivering measurable results, supported by a strong scientific foundation.

Accessing the Jeff Nippard Program PDF

Jeff Nippard’s workout programs are readily available online, with PDF downloads accessible through various platforms like Google Drive, ensuring easy access to structured workout plans.

Free Download Options

Jeff Nippard’s workout programs are widely available for free download, with many enthusiasts sharing PDF versions on platforms like Google Drive. These documents often include detailed workout plans, weight progression strategies, and nutritional advice, making them a popular choice for fitness enthusiasts. However, it’s important to verify the authenticity and reliability of these downloads, as not all sources may be official or up-to-date. Additionally, some programs are shared within fitness communities, ensuring accessibility for those seeking structured guidance without cost. While free options are plentiful, supporting Jeff Nippard directly through official channels is encouraged to ensure quality and legality. These PDFs are highly regarded for their clarity and scientific approach, catering to both beginners and advanced lifters aiming for muscle growth and strength gains.

Google Drive and Online Platforms

Jeff Nippard’s workout programs are frequently shared on Google Drive and other online platforms, offering easy access to his detailed training plans. Many fitness enthusiasts and communities upload his PDFs, including programs like the Upper/Lower split and arm hypertrophy, to these platforms. These documents often include structured workout routines, weight progression plans, and nutritional advice, making them highly sought after by those looking to enhance their fitness journeys. While these resources are widely available, it’s important to verify the source to ensure authenticity and safety. Online platforms have become a hub for sharing and accessing these programs, catering to the growing demand for effective and scientifically-backed training guides.

Important Considerations

When accessing Jeff Nippard’s programs, ensure you verify the legitimacy of the source to avoid unauthorized downloads. Always prioritize supporting the creator through official channels.

Legal and Ethical Aspects

Downloading Jeff Nippard’s program PDF from unauthorized sources may infringe on copyright laws. His content is protected under intellectual property rights, and unauthorized distribution is illegal. Ethically, it’s important to support creators by purchasing official programs, ensuring they can continue producing high-quality content. Using pirated material undermines the efforts of fitness professionals and violates ethical standards. Always opt for legitimate sources to access his programs, respecting both legal boundaries and the value of his work. This approach fosters fairness and sustainability for both creators and consumers in the fitness community.

Supporting the Creator

Supporting Jeff Nippard by purchasing his official programs ensures he can continue creating high-quality fitness content. His work is designed with meticulous attention to detail, backed by scientific research and personal experience. By buying directly from his platforms, you contribute to his ability to develop new resources and maintain his educational efforts. This support also fosters a sustainable model for fitness professionals to thrive. Many fans and users emphasize the importance of ethical consumption, encouraging others to invest in his legitimate offerings rather than seeking free downloads. This not only benefits the creator but also enhances the overall community by promoting original and reliable content.

chevy equinox key fob programming instructions

Program your Chevy Equinox key fob to sync it with your vehicle for seamless operation․ This process involves specific steps and tools to ensure proper synchronization․

Preparing for Key Fob Programming

Gather a working key, new key fob, flathead screwdriver, and CR2032 battery․ Ensure your vehicle is in park and consult the owner’s manual for specific preparation steps․

Necessary Tools and Materials

To program your Chevy Equinox key fob, you will need a few essential tools and materials․ First, ensure you have a working key fob or a spare key to access the vehicle’s systems․ A new, unprogrammed key fob is required for the programming process․ Additionally, you may need a flathead screwdriver to access the battery compartment of the key fob․ A CR2032 battery is typically used to power the fob, so it’s wise to have a replacement ready․ Finally, consult your vehicle’s owner’s manual for specific instructions and recommendations․ Having these tools and materials prepared will streamline the programming process and ensure everything works smoothly․

Programming Instructions for Chevy Equinox Key Fob

Insert the existing key into the ignition and turn it to the ON position․ Press the vehicle information button until “Press to Relearn Remote” appears․ Follow the prompts to sync your key fob․

General Steps for Programming

Start by inserting a working key into the ignition and turning it to the ON position without starting the engine․ Press the vehicle information button until “Press to Relearn Remote” appears on the display․ This step initializes the programming mode․ Next, press and hold the Unlock and Lock buttons on the key fob simultaneously for about 15 seconds until you hear the door locks cycle, indicating the system has recognized the fob․ If you’re using a flip key, ensure the blade is fully extended․ Repeat this process for additional key fobs you wish to program․ Once complete, test the fob to ensure all functions, such as engine start and remote entry, work properly․ If issues arise, consult a professional or refer to your vehicle’s manual for further guidance․ Proper synchronization ensures your Chevy Equinox recognizes and responds to the key fob commands effectively․

Programming Instructions for 2010-2013 Models

For 2010-2013 Chevy Equinox models, start by inserting a working key into the ignition and turning it to the ON position without starting the engine․ Press the Vehicle Information button until the display shows “Press to Relearn Remote․” This initializes programming mode․ Next, press and hold the Unlock and Lock buttons on the key fob simultaneously for about 15 seconds until you hear a chime, indicating the system has recognized the fob; If using a flip key, ensure the blade is fully extended․ Repeat this process for additional key fobs․ Once complete, test the fob to ensure all functions work properly․ If issues arise, consult a professional or refer to your vehicle’s manual․ This method ensures your key fob is properly synced with your Chevy Equinox, enabling seamless operation of all remote functions․ Proper synchronization is essential for reliable performance․ Follow these steps carefully to avoid complications․

Programming Instructions for 2016-2020 Models

For 2016-2020 Chevy Equinox models, insert a working key into the ignition and turn it to the ON/RUN position without starting the engine․ Press the Vehicle Information button until the display shows “Press to Relearn Remote․” This initializes programming mode․ Next, press and hold the Unlock and Lock buttons on the key fob simultaneously for about 15 seconds until you hear a chime, indicating the system has recognized the fob․ If using a flip key, ensure the blade is fully extended․ Repeat this process for additional key fobs․ Once complete, test the fob to ensure all functions work properly․ If issues arise, consult a professional or refer to your vehicle’s manual․ This method ensures your key fob is properly synced with your Chevy Equinox, enabling seamless operation of all remote functions․ Proper synchronization is essential for reliable performance․ Follow these steps carefully to avoid complications․

Testing the Key Fob

After programming, test the key fob by pressing the Lock, Unlock, and Start buttons to ensure proper functionality․ Verify that the vehicle responds correctly to each command for reliable operation․

Testing Engine Start Function

To test the engine start function, insert the programmed key fob into the ignition and turn it to the ON position without starting the engine․ Press the Start/Stop button to see if the engine turns over and starts smoothly․ If successful, the dashboard lights should illuminate, and the engine should run․ If the vehicle doesn’t start, ensure the key fob is properly synchronized and repeat the programming process if necessary․ Verify that all electrical systems, such as lights and accessories, function correctly during the test; If issues persist, consult a professional technician or the dealership for further assistance․ Proper testing ensures the key fob operates reliably for starting the vehicle․

Testing Remote Keyless Functions

After programming your Chevy Equinox key fob, test the remote keyless functions to ensure proper operation․ Start by standing near the vehicle and press the Lock button on the key fob․ Verify that all doors lock and the confirmation sound is audible․ Next, press the Unlock button to check if the doors unlock and the sound indicates the system is disarmed․ Test the Panic button by pressing and holding it; ensure the vehicle’s alarm activates with flashing lights and audible alerts․ Additionally, check the trunk release function by pressing the dedicated button on the fob and confirming the trunk opens․ Finally, verify the keyless entry range by testing the buttons from varying distances to ensure reliable performance․ If any function fails, recheck the programming steps or consult a professional for assistance․ Proper testing ensures all remote features operate seamlessly․

Battery Replacement Guide

Replace the battery in your Chevy Equinox key fob by opening the compartment, typically with a small screwdriver․ Swap the old CR2032 battery with a new one, ensuring correct orientation․ Close and test the fob․

Accessing the Battery Compartment

To access the battery compartment of your Chevy Equinox key fob, start by locating the small notch or groove on the back or side of the fob․ Use a small screwdriver or a coin to carefully pry open the compartment; Gently insert the tool into the notch and apply light pressure until the cover pops open․ Once open, you’ll see the battery inside, which is typically a CR2032 lithium coin cell battery․ Ensure you handle the compartment carefully to avoid damaging the internal components․ If your key fob has a flip key design, you may need to slide the key blade out first before accessing the battery․ Always refer to your owner’s manual or a trusted guide for specific instructions tailored to your Equinox model year․ Proper care during this process will help maintain the functionality of your key fob․

Replacing the Battery

Once you’ve accessed the battery compartment, carefully remove the old battery from its slot․ Take note of the battery’s orientation to ensure the new one is inserted correctly․ Replace the old battery with a new CR2032 lithium coin cell battery, aligning the positive (+) side to match the diagram or markings inside the compartment․ Gently press the new battery into place until it clicks or fits snugly․ Avoid touching the battery terminals with your fingers to prevent any residue buildup․ After replacing the battery, close the compartment securely by aligning the edges and snapping it shut․ Test the key fob immediately to ensure proper functionality․ If the fob doesn’t work, double-check the battery orientation and ensure the compartment is closed properly․ Dispose of the old battery responsibly, following local guidelines for battery recycling․

Troubleshooting Common Issues

Identify and resolve issues with your Chevy Equinox key fob by checking for battery life, programming errors, or physical damage․ Ensure proper synchronization and test functionality after addressing each potential problem․

Common Programming Issues

Common issues during Chevy Equinox key fob programming include weak battery signals, improper synchronization, or physical damage to the fob․ Ensure the battery is fresh and the fob is undamaged․ If the vehicle doesn’t recognize the key, check for incomplete programming steps or interference from other devices․ Some users report issues with the car not responding to the fob after programming, which may require re-initiating the process․ Additionally, if the key fob was previously programmed to another vehicle, it might not sync properly with your Equinox․ Always follow the recommended steps precisely and test the fob immediately after programming to identify any issues early․ If problems persist, consult a professional or refer to the manufacturer’s guidelines for further assistance․

Troubleshooting Solutions

If your Chevy Equinox key fob isn’t functioning after programming, start by replacing the battery with a fresh one․ Ensure the battery compartment is clean and free of corrosion․ Next, re-initiate the programming process, carefully following each step․ If the issue persists, check for any damage to the fob or vehicle’s keyless entry system․ Resetting the system by cycling the ignition switch on and off can sometimes resolve synchronization problems․ Additionally, ensure no other electronic devices are interfering with the signal․ If the key fob still doesn’t work, try using a spare key or consulting a professional technician․ Always refer to the manufacturer’s guidelines for specific troubleshooting steps tailored to your Equinox model year․

Programming a Chevy Equinox key fob is a manageable process with the right tools and instructions․ Whether you’re tackling it at home or seeking professional help, ensuring each step is followed carefully will help maintain your vehicle’s security and convenience․ Regular battery replacements and proper troubleshooting can extend the life of your key fob․ By adhering to the outlined steps and staying informed, you can keep your Chevrolet Equinox functioning smoothly․ For complex issues, consulting a certified technician is recommended to prevent potential damage․ Remember to always refer to the latest guidelines for your specific model year to ensure compatibility and effectiveness․ With these insights, you’re equipped to handle key fob programming with confidence․