citizen watch eco drive manual
Citizen Eco-Drive: A Comprehensive Manual Guide
Accessing Gmail involves logging in via computer or app‚ ensuring secure closure on public devices‚ and managing message access with options for copying and forwarding.
Understanding Eco-Drive Technology
Citizen’s Eco-Drive represents a revolutionary approach to watch power‚ eliminating the need for traditional battery replacements. This innovative technology harnesses the power of light – both natural and artificial – converting it into energy to power the watch. Accessing Gmail‚ whether on a computer or through the mobile app‚ mirrors this convenience; a constant connection readily available.
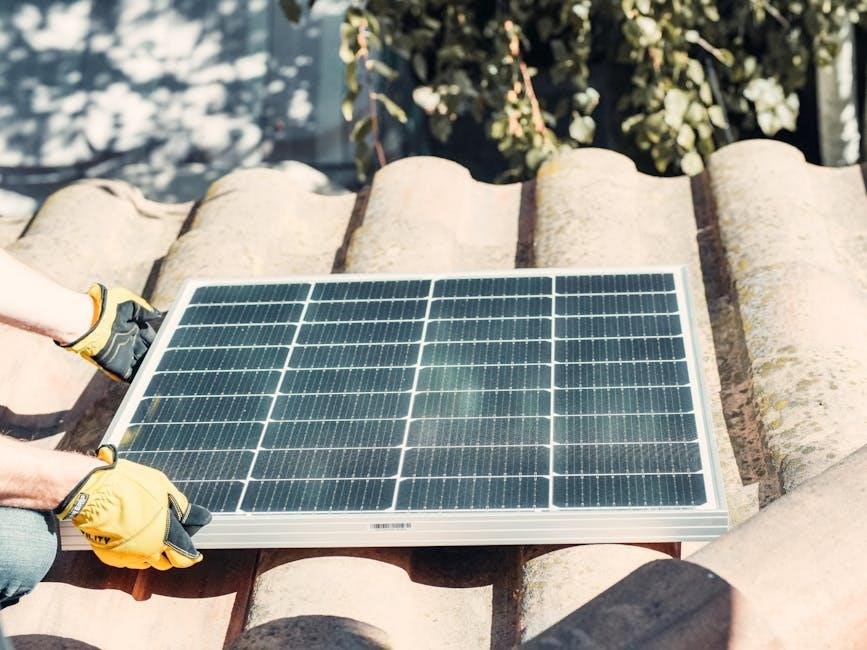
The core principle revolves around a solar cell integrated beneath the watch dial. This cell captures light and feeds it to a rechargeable lithium-ion capacitor. Similar to managing Gmail access‚ ensuring a secure sign-out on public computers is crucial. The capacitor stores the generated energy‚ providing sustained operation even in the dark.
Understanding how to add Gmail to your account‚ and utilizing features like forwarding or attaching messages‚ parallels grasping Eco-Drive’s self-sufficiency. The system intelligently manages power consumption‚ optimizing performance and extending operational life. This technology isn’t just about convenience; it’s a commitment to sustainability‚ reducing battery waste and offering a reliable timekeeping solution.
What is Eco-Drive?
Eco-Drive‚ pioneered by Citizen‚ is a unique watch technology that powers timepieces using any light source – sunlight‚ fluorescent‚ or even incandescent. Much like accessing Gmail from various devices‚ Eco-Drive offers versatility in its energy source. It’s a sustainable alternative to traditional quartz watches reliant on battery replacements‚ reducing environmental impact.
Essentially‚ Eco-Drive watches contain a miniature solar panel hidden beneath the dial. This panel converts light into electrical energy‚ storing it within a rechargeable capacitor. Managing your Gmail inbox‚ including options to copy‚ paste‚ and download‚ reflects the control Eco-Drive provides over its power source.
The technology isn’t merely about eliminating batteries; it’s about continuous‚ reliable operation. Eco-Drive watches continue running even in darkness‚ utilizing the stored energy. Similar to adding Gmail to your account for seamless access‚ Eco-Drive integrates effortlessly into daily life‚ offering a worry-free timekeeping experience.
How Eco-Drive Works: Light Power Conversion
The core of Eco-Drive lies in its efficient light-to-energy conversion process. Similar to accessing Gmail through a computer or mobile app‚ the process begins with light striking the watch’s solar cell‚ discreetly positioned under the dial. This cell‚ composed of amorphous silicon‚ generates electricity when exposed to light – any light‚ regardless of intensity.
This generated electricity isn’t used directly to power the watch’s movement. Instead‚ it charges a rechargeable lithium-ion capacitor. Think of it like storing emails in your Gmail inbox; the energy is accumulated for later use. Once fully charged‚ the capacitor provides sustained power‚ even in complete darkness.
The amount of light needed for charging is surprisingly minimal. Even indoor lighting can contribute to maintaining the power reserve. Just as you can choose delivery options in Gmail‚ Eco-Drive optimizes energy usage for consistent performance‚ ensuring your watch remains accurate and functional without frequent charging concerns.
Eco-Drive Benefits: Sustainability & Convenience
Citizen Eco-Drive technology delivers a compelling combination of environmental responsibility and user convenience. Much like accessing Gmail from various devices‚ Eco-Drive offers flexibility – eliminating the need for traditional battery replacements‚ a significant source of waste. This aligns with sustainable practices‚ reducing your environmental footprint.
The convenience factor is equally impressive. Forget the hassle and cost of periodic battery changes. As long as your watch is exposed to some light‚ it continues to operate. This is akin to Gmail automatically saving drafts; the watch perpetually recharges itself.
Furthermore‚ Eco-Drive watches often boast extended power reserves‚ allowing them to function for months‚ even years‚ on a single full charge. This reliability and freedom from battery concerns make Eco-Drive a practical and eco-conscious choice for everyday wear‚ mirroring the seamless accessibility of Gmail.

Citizen Watch Features & Functions
Gmail access‚ like Citizen watch functions‚ offers diverse options: computer login‚ app integration‚ message handling‚ and account management for a streamlined experience.
Basic Time & Date Setting
Successfully utilizing your Citizen Eco-Drive watch begins with mastering fundamental time and date adjustments. Accessing Gmail mirrors this initial setup – requiring a login to personalize your experience. For time setting‚ typically‚ you’ll pull the crown out to the first click. This allows for independent adjustment of the hour and minute hands. Rotate the crown to move the hands until the correct time is displayed.
Date setting often involves pulling the crown out to the second click. Rotating the crown will then adjust the date. Ensure the date changes correctly at midnight. Remember‚ like securing your Gmail account‚ precise settings are crucial. Following these steps ensures accurate timekeeping and date display on your Eco-Drive watch‚ providing reliable functionality. Always refer to your specific model’s instructions for variations.
Setting the Time on Your Eco-Drive Watch
Precisely setting the time on your Citizen Eco-Drive watch is a straightforward process‚ akin to logging into Gmail – a foundational step for optimal use. Begin by gently pulling the crown out to its first position. This disengages the hands from the movement‚ allowing for manual adjustment. Rotate the crown clockwise or counterclockwise to move the hour and minute hands until they align with the correct time.
Pay close attention to the AM/PM indicator‚ if present‚ to ensure accuracy. Once the desired time is set‚ carefully push the crown back in to its original position. This re-engages the hands with the movement‚ securing the new time setting. Like securing your Gmail session on a public computer‚ this final step is vital. Double-check the time to confirm it’s correctly displayed before proceeding;
Date Adjustment Procedures
Adjusting the date on your Citizen Eco-Drive watch mirrors the careful attention needed when managing email access – precision is key. Typically‚ pulling the crown out to the second position enables date adjustment. Rotate the crown to cycle through the dates until the correct day of the month appears. Some models may require rotating the crown in the opposite direction for forward or backward date changes.
Be mindful of AM/PM considerations‚ as incorrect settings can lead to inaccuracies. After setting the correct date‚ gently push the crown back to its original position. Similar to closing a Gmail session on a public device‚ this secures the adjustment. Verify the date display to confirm accuracy. If your watch features a day-of-the-week display‚ it will automatically update alongside the date.
Using the Chronograph Function
Employing the chronograph‚ like accessing Gmail features‚ requires understanding its controls. Typically‚ the top right pusher initiates the chronograph‚ starting the elapsed time measurement. The same pusher again halts the timing. The bottom right pusher resets the chronograph hands to zero‚ preparing for a new measurement – akin to clearing your inbox.
Understanding the sub-dials is crucial; they often display seconds‚ minutes‚ and sometimes hours. Accurate readings depend on correctly interpreting these displays. Remember that the chronograph function operates independently of the standard timekeeping. Like managing email attachments‚ precision is vital. Practice using the chronograph to become familiar with its operation and ensure accurate timing for various events.
Chronograph Start‚ Stop‚ and Reset
Initiating the chronograph function mirrors accessing Gmail – a deliberate action. Pressing the top right pusher begins timing‚ activating the central seconds hand as a timer. A subsequent press of the same pusher halts the measurement‚ freezing the elapsed time on the sub-dials. This pause allows for reading the recorded duration‚ similar to reviewing a sent email.
To reset the chronograph and prepare for a new timing session‚ depress the bottom right pusher. This action returns all chronograph hands to their starting positions – zero. Just as closing a Gmail session ensures privacy‚ resetting clears the previous measurement. Familiarize yourself with the pusher locations for smooth operation. Consistent practice will build muscle memory‚ enabling quick and accurate chronograph control.
Understanding Chronograph Measurements
Deciphering chronograph readings resembles managing Gmail inbox options – requiring attention to detail. The main seconds hand indicates elapsed seconds‚ while sub-dials track minutes and hours. Typically‚ a smaller dial at 3 o’clock measures elapsed minutes‚ and another at 6 o’clock displays running hours‚ mirroring how Gmail organizes messages.
Accuracy depends on understanding the scale of each sub-dial. Note that some Eco-Drive chronographs offer a 24-hour sub-dial‚ requiring interpretation. The chronograph doesn’t impact the standard timekeeping function; it runs independently. Like choosing delivery options in Gmail‚ understanding these measurements allows precise timing of events. Regular use and observation will refine your ability to quickly and accurately interpret chronograph data.
Advanced Eco-Drive Features
Gmail access mirrors Eco-Drive’s complexity: computers or apps provide entry‚ while account addition streamlines usage‚ offering versatile email management capabilities.
World Time Function: Setting & Usage
Navigating Gmail’s features parallels utilizing the World Time function – both require initial setup for optimal performance. Accessing Gmail from various devices‚ like a Citizen watch accessing global times‚ demands understanding the interface. To effectively use the World Time feature‚ first ensure your Eco-Drive watch is in the correct mode.
Typically‚ this involves cycling through functions using the crown or buttons. Once in World Time mode‚ you’ll select a city representing a desired time zone. The watch then displays the corresponding time. Adjustments are made by selecting a city and confirming the choice. Remember‚ consistent synchronization with a reliable time source is crucial‚ just as regularly checking Gmail ensures you receive timely updates.
Consider the implications of adding Gmail to your account; similarly‚ selecting the correct city ensures accurate global timekeeping. This feature is invaluable for travelers or those coordinating with individuals across different time zones‚ mirroring Gmail’s ability to connect you globally.
How to Utilize the World Time Feature
Similar to managing Gmail’s inbox‚ effectively using the World Time feature requires a systematic approach. Begin by pressing the appropriate button to enter World Time mode – consult your specific model’s manual for precise instructions. Once activated‚ the display will likely show a city code. Use the crown or buttons to scroll through the available cities‚ representing different time zones.
Selecting a city automatically sets the corresponding time. Some models allow direct input of city codes‚ streamlining the process. Remember that accurate timekeeping relies on proper initial setup‚ much like configuring Gmail settings for optimal email delivery. Regularly verifying the displayed time against a known accurate source is recommended.
This feature is particularly useful for frequent travelers or individuals communicating with contacts globally‚ mirroring Gmail’s global reach. Mastering this function enhances your watch’s utility‚ providing a convenient world clock on your wrist.
Perpetual Calendar Explained

Analogous to Gmail’s archiving system‚ the Perpetual Calendar function intelligently manages date complexities. Unlike standard calendars requiring manual adjustments for shorter months and leap years‚ a Perpetual Calendar automatically corrects for these variations. This ensures the date remains accurate for centuries‚ minimizing user intervention – similar to Gmail’s automatic spam filtering.
The system internally stores the date and time information‚ calculating date changes with precision. However‚ initial setup is crucial. Correctly setting the year‚ month‚ and day is paramount for the calendar’s long-term accuracy. Some models require a specific sequence of button presses to activate and configure this feature.
Think of it as pre-setting filters in Gmail; once configured‚ it operates autonomously. While incredibly accurate‚ occasional verification against a known calendar is advisable‚ especially after a prolonged period without use.
Perpetual Calendar Setting Instructions
Similar to adding a Gmail account‚ setting the Perpetual Calendar demands a precise sequence. First‚ ensure the watch is in Timekeeping Mode. Typically‚ pull the crown out to the first click. Then‚ cycle through the settings using the crown – often requiring multiple pulls and pushes – until you reach the year setting.
Adjust the year using the crown‚ paying close attention to the direction of rotation. Next‚ set the month and day‚ again utilizing the crown for adjustments. Some models feature a dedicated button for direct date selection‚ akin to choosing a folder in Gmail.
Confirm each setting by pressing a button (often the same one used to cycle through modes). Incorrect initial settings will compromise the calendar’s accuracy. Refer to your specific model’s diagram for button locations and precise procedures. Double-check all entries before finalizing‚ ensuring the date aligns with a known calendar.
Power Reserve Indicator: Interpreting the Display
Like managing Gmail inbox options‚ understanding the Power Reserve Indicator is crucial for Eco-Drive functionality. This indicator displays the stored energy‚ vital as it dictates how long your watch will run without light exposure. Typically‚ it’s represented by a series of segments or a needle on a sub-dial.
A full charge‚ similar to a fully organized email folder‚ shows all segments illuminated or the needle pointing to ‘H’ (High). As energy depletes‚ segments disappear or the needle moves towards ‘L’ (Low). Reaching ‘L’ signifies imminent power saving mode‚ where the watch halts to conserve energy‚ much like archiving old emails.
If the indicator drops to ‘E’ (Empty)‚ the watch enters a stopped state. Exposure to light will then recharge the battery. Consistent monitoring of the indicator ensures your watch remains operational‚ preventing unexpected stoppages. Remember‚ regular light exposure is key‚ mirroring consistent email checking.
Understanding the Power Reserve Levels
Similar to Gmail’s storage capacity alerts‚ Eco-Drive power reserve levels indicate remaining operational time. ‘H’ (High) signifies a full charge‚ typically lasting months‚ offering uninterrupted function like a well-maintained inbox. The watch operates normally with all features accessible.
As the reserve drops to ‘M’ (Medium)‚ the watch continues functioning‚ but power-saving features may subtly engage. This is akin to Gmail’s auto-archiving‚ optimizing performance. ‘L’ (Low) indicates minimal reserve; the seconds hand may move in two-second intervals‚ conserving energy.
Reaching ‘E’ (Empty) triggers ‘Power Save’ mode‚ halting the watch to preserve remaining energy‚ comparable to Gmail’s offline access. Recharge via light exposure. Understanding these levels allows proactive charging‚ preventing interruptions. Consistent monitoring‚ like checking email regularly‚ ensures reliable timekeeping.
Maintenance & Troubleshooting
Gmail access requires secure logins‚ account additions to devices‚ and managing message options—copying‚ forwarding‚ and delivery preferences—for optimal email functionality.
Water Resistance & Care
Maintaining your Citizen Eco-Drive’s water resistance is crucial for longevity. While Citizen watches offer varying degrees of water resistance‚ from splash-proof to suitable for diving‚ understanding your watch’s specific rating is paramount. Avoid operating the crown or pushers while submerged‚ as this can compromise the seals.
Regularly rinse your watch with fresh water after exposure to saltwater or chlorine to prevent corrosion. Avoid extreme temperatures and harsh chemicals‚ as these can damage the seals and affect water resistance. Periodically have the water resistance checked by a qualified Citizen watch technician‚ especially after battery replacements or if the watch has sustained impact.
Remember that water resistance isn’t permanent and can diminish over time due to wear and tear. Proper care‚ including avoiding forceful contact and regular inspection‚ will help ensure your Citizen Eco-Drive remains water-resistant and reliable for years to come. Following these guidelines will protect your investment.
Recommended Water Resistance Practices
To safeguard your Citizen Eco-Drive’s water resistance‚ several practices are essential. Always ensure the crown is fully pushed in or screwed down tightly before any water exposure. Avoid hot water‚ steam‚ and soapy water‚ as these can degrade the seals over time. Regularly inspect the gaskets for cracks or damage; a qualified technician should replace them if necessary.
Be mindful of the watch’s specified water resistance level. A 30-meter rating is suitable for splashes only‚ while 100 meters allows for swimming and snorkeling. Diving requires a watch with at least 200-meter water resistance. After swimming in saltwater‚ rinse the watch thoroughly with fresh water.
Avoid exposing the watch to strong impacts or vibrations while it’s wet‚ as this can force water past the seals. Professional servicing every two to three years is recommended to maintain optimal water resistance and overall watch health‚ ensuring continued reliability.
Battery & Charging Considerations
Citizen Eco-Drive watches don’t require traditional battery replacements; they utilize light to recharge. However‚ understanding charging is crucial. Prolonged darkness can lead to ‘power save’ mode‚ halting the watch to conserve energy. Exposure to any light source – natural or artificial – will revive it‚ though brighter light charges faster.
Avoid leaving the watch in extremely dark places for extended periods. While Eco-Drive watches store a significant reserve charge‚ complete depletion over years can potentially shorten the lifespan of the rechargeable capacitor. Charging efficiency isn’t significantly affected by the type of light‚ but intensity and duration matter.
If a watch hasn’t been exposed to light for a long time‚ it may take several hours of continuous light to fully recharge. Regular wear‚ even indoors‚ generally provides sufficient charging to maintain accurate timekeeping and function.
Maximizing Eco-Drive Charging Efficiency
To optimize charging‚ prioritize consistent light exposure. While any light source works‚ direct sunlight or bright indoor lighting significantly accelerates the process. Avoid storing your watch in drawers or dark cabinets for extended periods; a windowsill or well-lit room is ideal.
Regular wear is the most effective charging method. Even ambient indoor light contributes to maintaining the power reserve. If the watch has been depleted‚ initial charging may require several hours of bright‚ direct light. Consider a dedicated watch charging stand for consistent‚ focused illumination.
Ensure the watch face is unobstructed for maximum light absorption. Clean the crystal regularly to remove any grime that could impede light penetration. Remember‚ consistent‚ moderate light exposure is more beneficial than infrequent‚ intense bursts.
Troubleshooting Common Issues
If your Eco-Drive watch isn’t functioning‚ begin with a reset. This often resolves minor glitches. If the second hand isn’t moving‚ check for sufficient light exposure – the watch may simply need charging. Ensure you’ve logged into Gmail securely‚ especially on public computers‚ and closed sessions afterward.
For persistent issues‚ verify the watch crystal is clean to allow optimal light absorption. If the watch was recently exposed to water‚ confirm the crown is fully sealed. Accessing Gmail via app or computer requires a stable connection.
If problems persist‚ consult the full Citizen manual or contact customer support. Remember to manage message access and delivery options within Gmail for optimal use. Avoid prolonged storage in darkness‚ as this depletes the power reserve.
Resetting Your Eco-Drive Watch
To reset your Citizen Eco-Drive‚ a common procedure involves holding the left side button down for several seconds. This initiates a reset of the watch’s functions‚ similar to logging into Gmail and managing account settings. Ensure sufficient charge before attempting a reset; a low reserve may prevent successful completion.
The second hand will typically move to the ‘R’ position‚ indicating the reset is in progress. This process clears temporary data and can resolve minor operational errors. Remember to secure your Gmail session on public computers.
Following the reset‚ you may need to re-set the time and date. Refer to the ‘Basic Time & Date Setting’ section for detailed instructions. Regularly checking and updating your Gmail settings is also recommended for optimal performance.